> For clean Markdown of any page, append .md to the page URL.
> For a complete documentation index, see https://docs.vapi.ai/llms.txt.
> For full documentation content, see https://docs.vapi.ai/llms-full.txt.
> For AI client integration (Claude Code, Cursor, etc.), connect to the MCP server at https://docs.vapi.ai/_mcp/server.
# Developing locally
 ## Quick solution: Vapi CLI + Tunneling
Use the Vapi CLI webhook forwarder along with a tunneling service to test webhooks locally:
```bash
# Terminal 1: Set up tunnel (example with ngrok)
ngrok http 4242
# Terminal 2: Install and run Vapi CLI
curl -sSL https://vapi.ai/install.sh | bash
vapi listen --forward-to localhost:3000/webhook
```
**Important:** The `vapi listen` command is a local forwarder only - it does NOT provide a public URL or tunnel. You must use a separate tunneling service (like ngrok) to expose the CLI's port (default 4242) to the internet, then configure your Vapi webhook URLs to use the tunnel's public URL.
[Learn more about the Vapi CLI →](/cli/webhook)
## Manual setup with ngrok
If you prefer to skip the CLI and connect ngrok directly to your application, follow the guide below.
## The Problem
When Vapi dispatches events to a server, it must be able to reach the server via the open Internet.
If your API is already live in production, it will be accessible via a publicly known URL. But, during development, your server will often be running locally on your machine.
`localhost` is an alias for the IP address `127.0.0.1`. This address is called the "loopback"
address and forwards the network request within the machine itself.
To receive server events locally, we will need a public address on the Internet that can receive traffic and forward it to our local machine.
## Tunneling Traffic
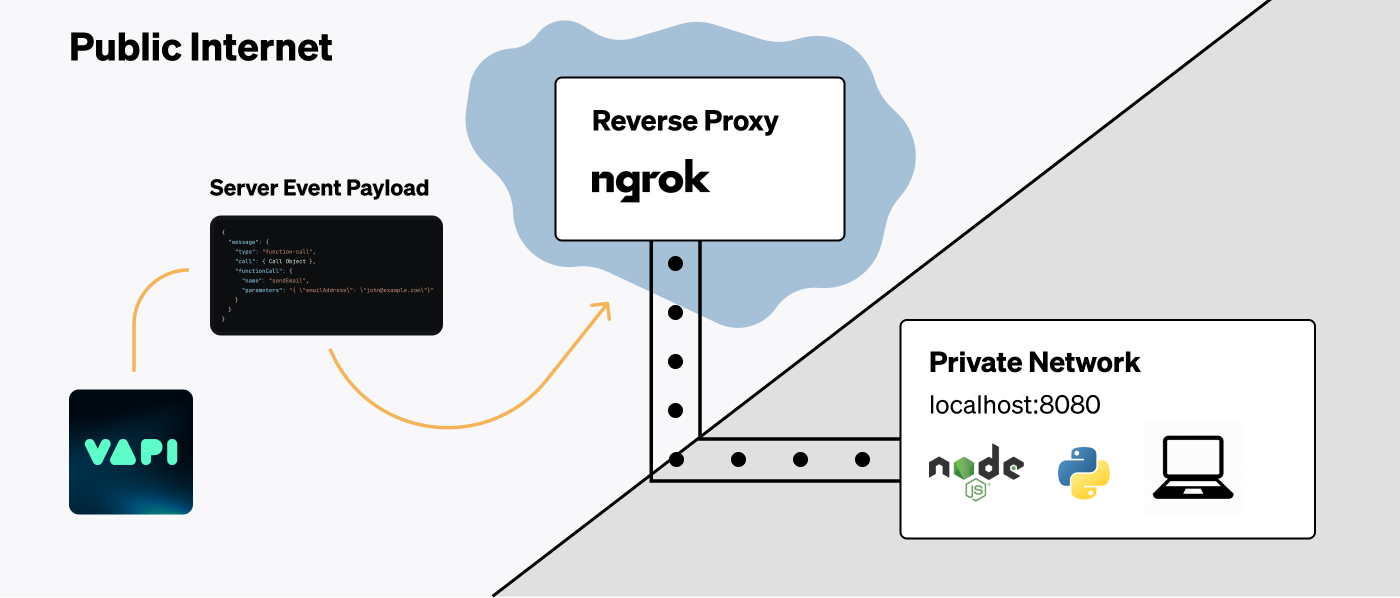
We will be using a service called [ngrok](https://ngrok.com/) to create a secure tunnel to our local machine. The flow will look like the following:
We will start our server locally so it is listening for http traffic. We will take note of the port our server is running on.
We will use the `ngrok` command to start the [ngrok agent](https://ngrok.com/docs/agent) on our
machine. This will establish a connection from your local machine to ngrok's servers.
Ngrok will give us a public forwarding URL that can receive traffic. We will use this as a server URL
during development.
We will conduct normal calls on Vapi to trigger events. These events will go to the Ngrok URL & get tunnelled to our local machine.
We will see the event payloads come through locally & log them in our terminal.
#### Starting Our API Locally
First, ensure that your API is running locally. This could be a Node.js server, a Python server, or any other server that can receive HTTP requests.
Take note of the port that your server is running on. For example, if your server is running on port `8080`, you should be able to access it at `http://localhost:8080` in your browser.
#### Starting Ngrok Agent
Next we will install & run Ngrok agent to establish the forwarding pathway for Internet traffic:
Install the Ngrok agent by following Ngrok's [quickstart
guide](https://ngrok.com/docs/getting-started). Once complete, we will have the `ngrok` command
available in our terminal.
Run the command `ngrok http 8080`, this will create the tunnel with Ngrok's servers.
Replace `8080` with the port your server is running on.
#### Copy Ngrok Forwarding URL
You will see an output from the Ngrok Agent CLI that looks like the following:
## Quick solution: Vapi CLI + Tunneling
Use the Vapi CLI webhook forwarder along with a tunneling service to test webhooks locally:
```bash
# Terminal 1: Set up tunnel (example with ngrok)
ngrok http 4242
# Terminal 2: Install and run Vapi CLI
curl -sSL https://vapi.ai/install.sh | bash
vapi listen --forward-to localhost:3000/webhook
```
**Important:** The `vapi listen` command is a local forwarder only - it does NOT provide a public URL or tunnel. You must use a separate tunneling service (like ngrok) to expose the CLI's port (default 4242) to the internet, then configure your Vapi webhook URLs to use the tunnel's public URL.
[Learn more about the Vapi CLI →](/cli/webhook)
## Manual setup with ngrok
If you prefer to skip the CLI and connect ngrok directly to your application, follow the guide below.
## The Problem
When Vapi dispatches events to a server, it must be able to reach the server via the open Internet.
If your API is already live in production, it will be accessible via a publicly known URL. But, during development, your server will often be running locally on your machine.
`localhost` is an alias for the IP address `127.0.0.1`. This address is called the "loopback"
address and forwards the network request within the machine itself.
To receive server events locally, we will need a public address on the Internet that can receive traffic and forward it to our local machine.
## Tunneling Traffic
We will be using a service called [ngrok](https://ngrok.com/) to create a secure tunnel to our local machine. The flow will look like the following:
We will start our server locally so it is listening for http traffic. We will take note of the port our server is running on.
We will use the `ngrok` command to start the [ngrok agent](https://ngrok.com/docs/agent) on our
machine. This will establish a connection from your local machine to ngrok's servers.
Ngrok will give us a public forwarding URL that can receive traffic. We will use this as a server URL
during development.
We will conduct normal calls on Vapi to trigger events. These events will go to the Ngrok URL & get tunnelled to our local machine.
We will see the event payloads come through locally & log them in our terminal.
#### Starting Our API Locally
First, ensure that your API is running locally. This could be a Node.js server, a Python server, or any other server that can receive HTTP requests.
Take note of the port that your server is running on. For example, if your server is running on port `8080`, you should be able to access it at `http://localhost:8080` in your browser.
#### Starting Ngrok Agent
Next we will install & run Ngrok agent to establish the forwarding pathway for Internet traffic:
Install the Ngrok agent by following Ngrok's [quickstart
guide](https://ngrok.com/docs/getting-started). Once complete, we will have the `ngrok` command
available in our terminal.
Run the command `ngrok http 8080`, this will create the tunnel with Ngrok's servers.
Replace `8080` with the port your server is running on.
#### Copy Ngrok Forwarding URL
You will see an output from the Ngrok Agent CLI that looks like the following:
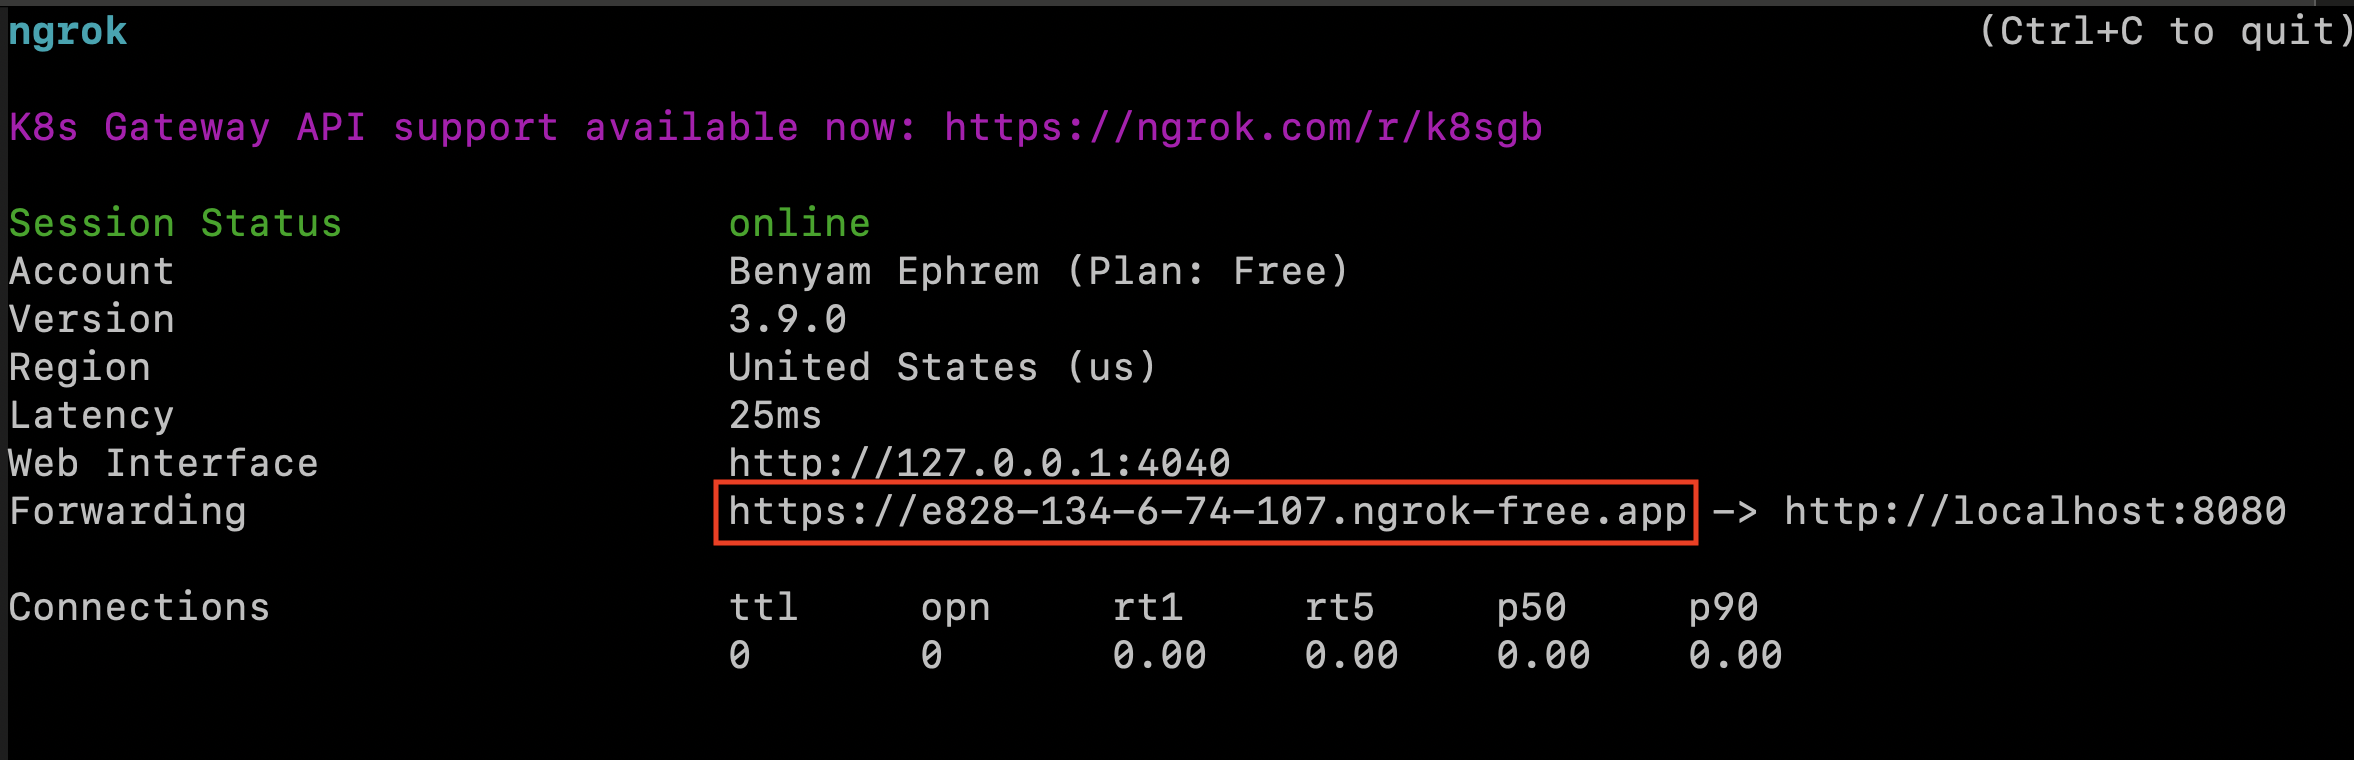 Copy this public URL that Ngrok provides. This URL will be accessible from the open Internet and will forward traffic to your local machine.
You can now use this as a server URL in the various places you can [set server URLs](/server-url/setting-server-urls) in Vapi.
This URL will change every time that you run the `ngrok` command. If you'd like this URL to be the
same every Ngrok session, look into [static domains on
Ngrok](https://ngrok.com/docs/getting-started#step-4-always-use-the-same-domain).
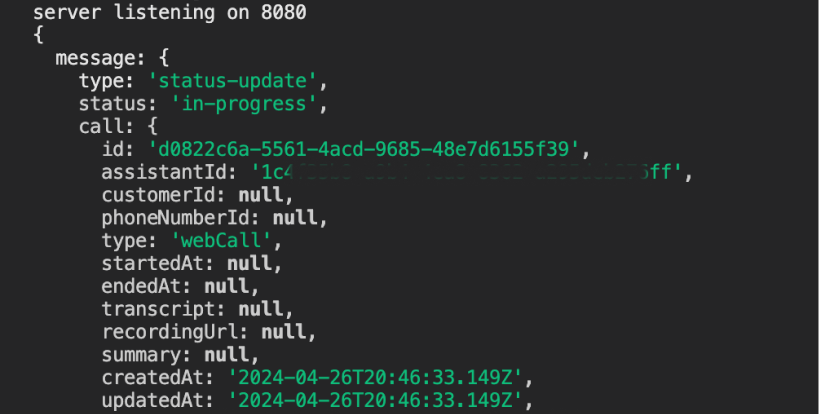
#### Trigger Call Events
We will now be able to see call events come through as `POST` requests, & can log payloads to our terminal.
Copy this public URL that Ngrok provides. This URL will be accessible from the open Internet and will forward traffic to your local machine.
You can now use this as a server URL in the various places you can [set server URLs](/server-url/setting-server-urls) in Vapi.
This URL will change every time that you run the `ngrok` command. If you'd like this URL to be the
same every Ngrok session, look into [static domains on
Ngrok](https://ngrok.com/docs/getting-started#step-4-always-use-the-same-domain).
#### Trigger Call Events
We will now be able to see call events come through as `POST` requests, & can log payloads to our terminal.
 Feel free to follow any of our [quickstart](/quickstart) guides to get started with building assistants & conducting calls.
## Troubleshooting
Here's a list of a few things to recheck if you face issues seeing payloads:
* Ensure that your local server is running on the port you expect
* Ensure that you input the correct port to the `ngrok http {your_port}` command
* Ensure your route handling server URL events is a `POST` endpoint
* Ensure your path on top of the base forwarding url is set correctly (ex: `/callbacks/vapi`)
Feel free to follow any of our [quickstart](/quickstart) guides to get started with building assistants & conducting calls.
## Troubleshooting
Here's a list of a few things to recheck if you face issues seeing payloads:
* Ensure that your local server is running on the port you expect
* Ensure that you input the correct port to the `ngrok http {your_port}` command
* Ensure your route handling server URL events is a `POST` endpoint
* Ensure your path on top of the base forwarding url is set correctly (ex: `/callbacks/vapi`)