

Phone calls
Overview
Vapi makes it easy to build voice agents that can make and receive phone calls. In under 5 minutes, you’ll create a voice assistant, give it a free phone number, and call it.
In this quickstart, you’ll learn to:
- Create an assistant using the Dashboard or programmatically
- Set up a phone number
- Call your assistant on its new phone number
- Optionally, place an outbound call from an imported number
Prerequisites
- A Vapi account
- For SDK usage: Vapi API key from the Dashboard
Using the Vapi CLI? You can create assistants, manage phone numbers, and make calls directly from your terminal:
Create your first voice assistant
New assistants use the Balanced preset for the transcriber, model, and voice. Templates use the preset that best fits the template.
Dashboard
TypeScript (Server SDK)
Python (Server SDK)
cURL
Create an assistant from a template
Select the down arrow next to Create Assistant, then choose Customer Support.
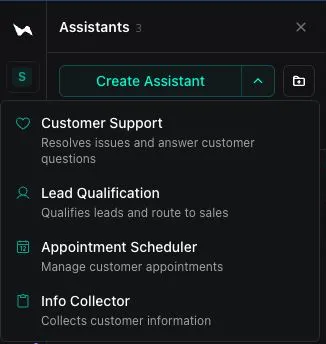
Each template includes a first message and a system prompt for a common use case. You can also choose Lead Qualification to qualify prospects for sales, Appointment Scheduler to book and manage appointments, or Info Collector to gather customer information.
Customize your assistant (optional)
The template works as is, so you can skip this step. To make it your own, update both the First Message and the System Prompt so the greeting matches what the assistant does. For tips on writing a system prompt, see the prompting guide.
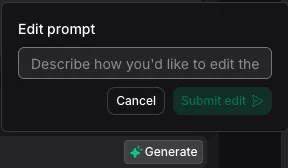
To edit the system prompt with AI, select Generate in the System Prompt section, describe the changes you want, then select Submit edit. Review the proposed edits, then select Accept changes.
Publish the assistant
Select Publish, review the changes, then select Quick Publish. Publishing creates a new assistant version. Until you publish, your changes are saved as a draft and don’t affect calls.
Set up a phone number
Give your assistant a free Vapi number so you can call it.
Dashboard
TypeScript (Server SDK)
Python (Server SDK)
cURL
Choose a phone number option
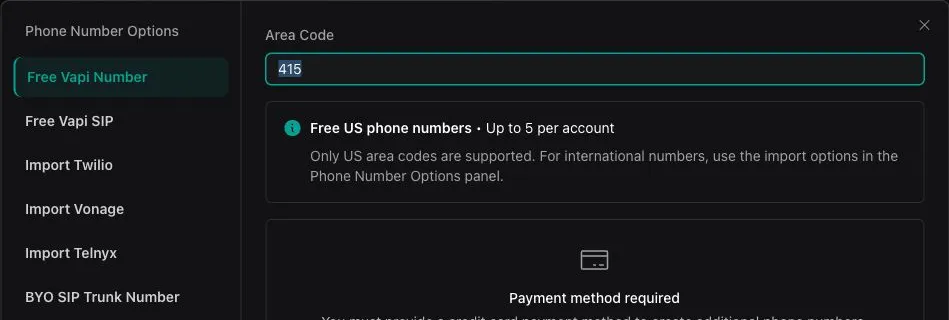
Select Create Phone Number, then choose Free Vapi Number or an option for importing a number from another provider.
Create a free Vapi number
If you chose Free Vapi Number, enter a three-digit US area code in Area Code, then select Create.
Your first free Vapi number doesn’t require a payment method. You may be asked to add one when you request more numbers. It can take a few minutes for the number to become active.
With free Vapi numbers, only inbound calls are supported. To make outbound calls, import a number from Twilio, Telnyx, or DIDWW. See Free Vapi numbers for details, and Pricing and Success Packages for how many numbers your package includes.
Call your assistant
Call the phone number you created from your own phone. Your assistant answers with its first message. A new number can take a few minutes to become active.
Have a short conversation to see how your assistant responds:
- Ask a question your assistant is built to handle.
- Interrupt it while it’s speaking to check that it stops and listens.
- Ask something off-topic to see how it steers the conversation back.
- Say goodbye and hang up.
After the call, open Logs → Calls in the Dashboard to review the transcript, recording, and how the call ended.
Place an outbound call (optional)
With free Vapi numbers, only inbound calls are supported. To make outbound calls, import a number from Twilio, Telnyx, or DIDWW. See Free Vapi numbers for details.
Dashboard
TypeScript (Server SDK)
Python (Server SDK)
cURL
Open the phone number
Open the Dashboard, select Phone Numbers, and select the imported phone number that will place the call.
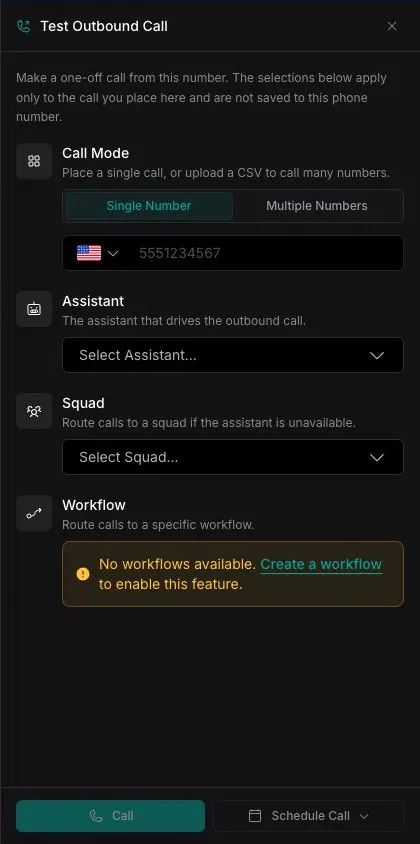
Your assistant will call the specified number immediately.
Test web calling (optional)
Open the Dashboard, select Assistants, and select the assistant you want to test. Select Talk to start a web call without a phone number.

Next steps
Now that you have a working voice assistant:
- Get ready for production: Follow Path to production to publish, test, and monitor your assistant.
- Customize the conversation: Update the system prompt for your use case with the prompting guide.
- Add tools: Connect your assistant to external APIs and databases with tools.
- Change the preset: Model Presets optimize the transcriber, model, and voice for quality, speed, or cost.
- Test with Simulations: Run an AI tester through complete conversations with the Simulations quickstart.
- Scale with the API: Create assistants with the Vapi API.
Ready to integrate voice into your application? Check out the Web calls quickstart to embed voice calls directly in your app.