Server authentication

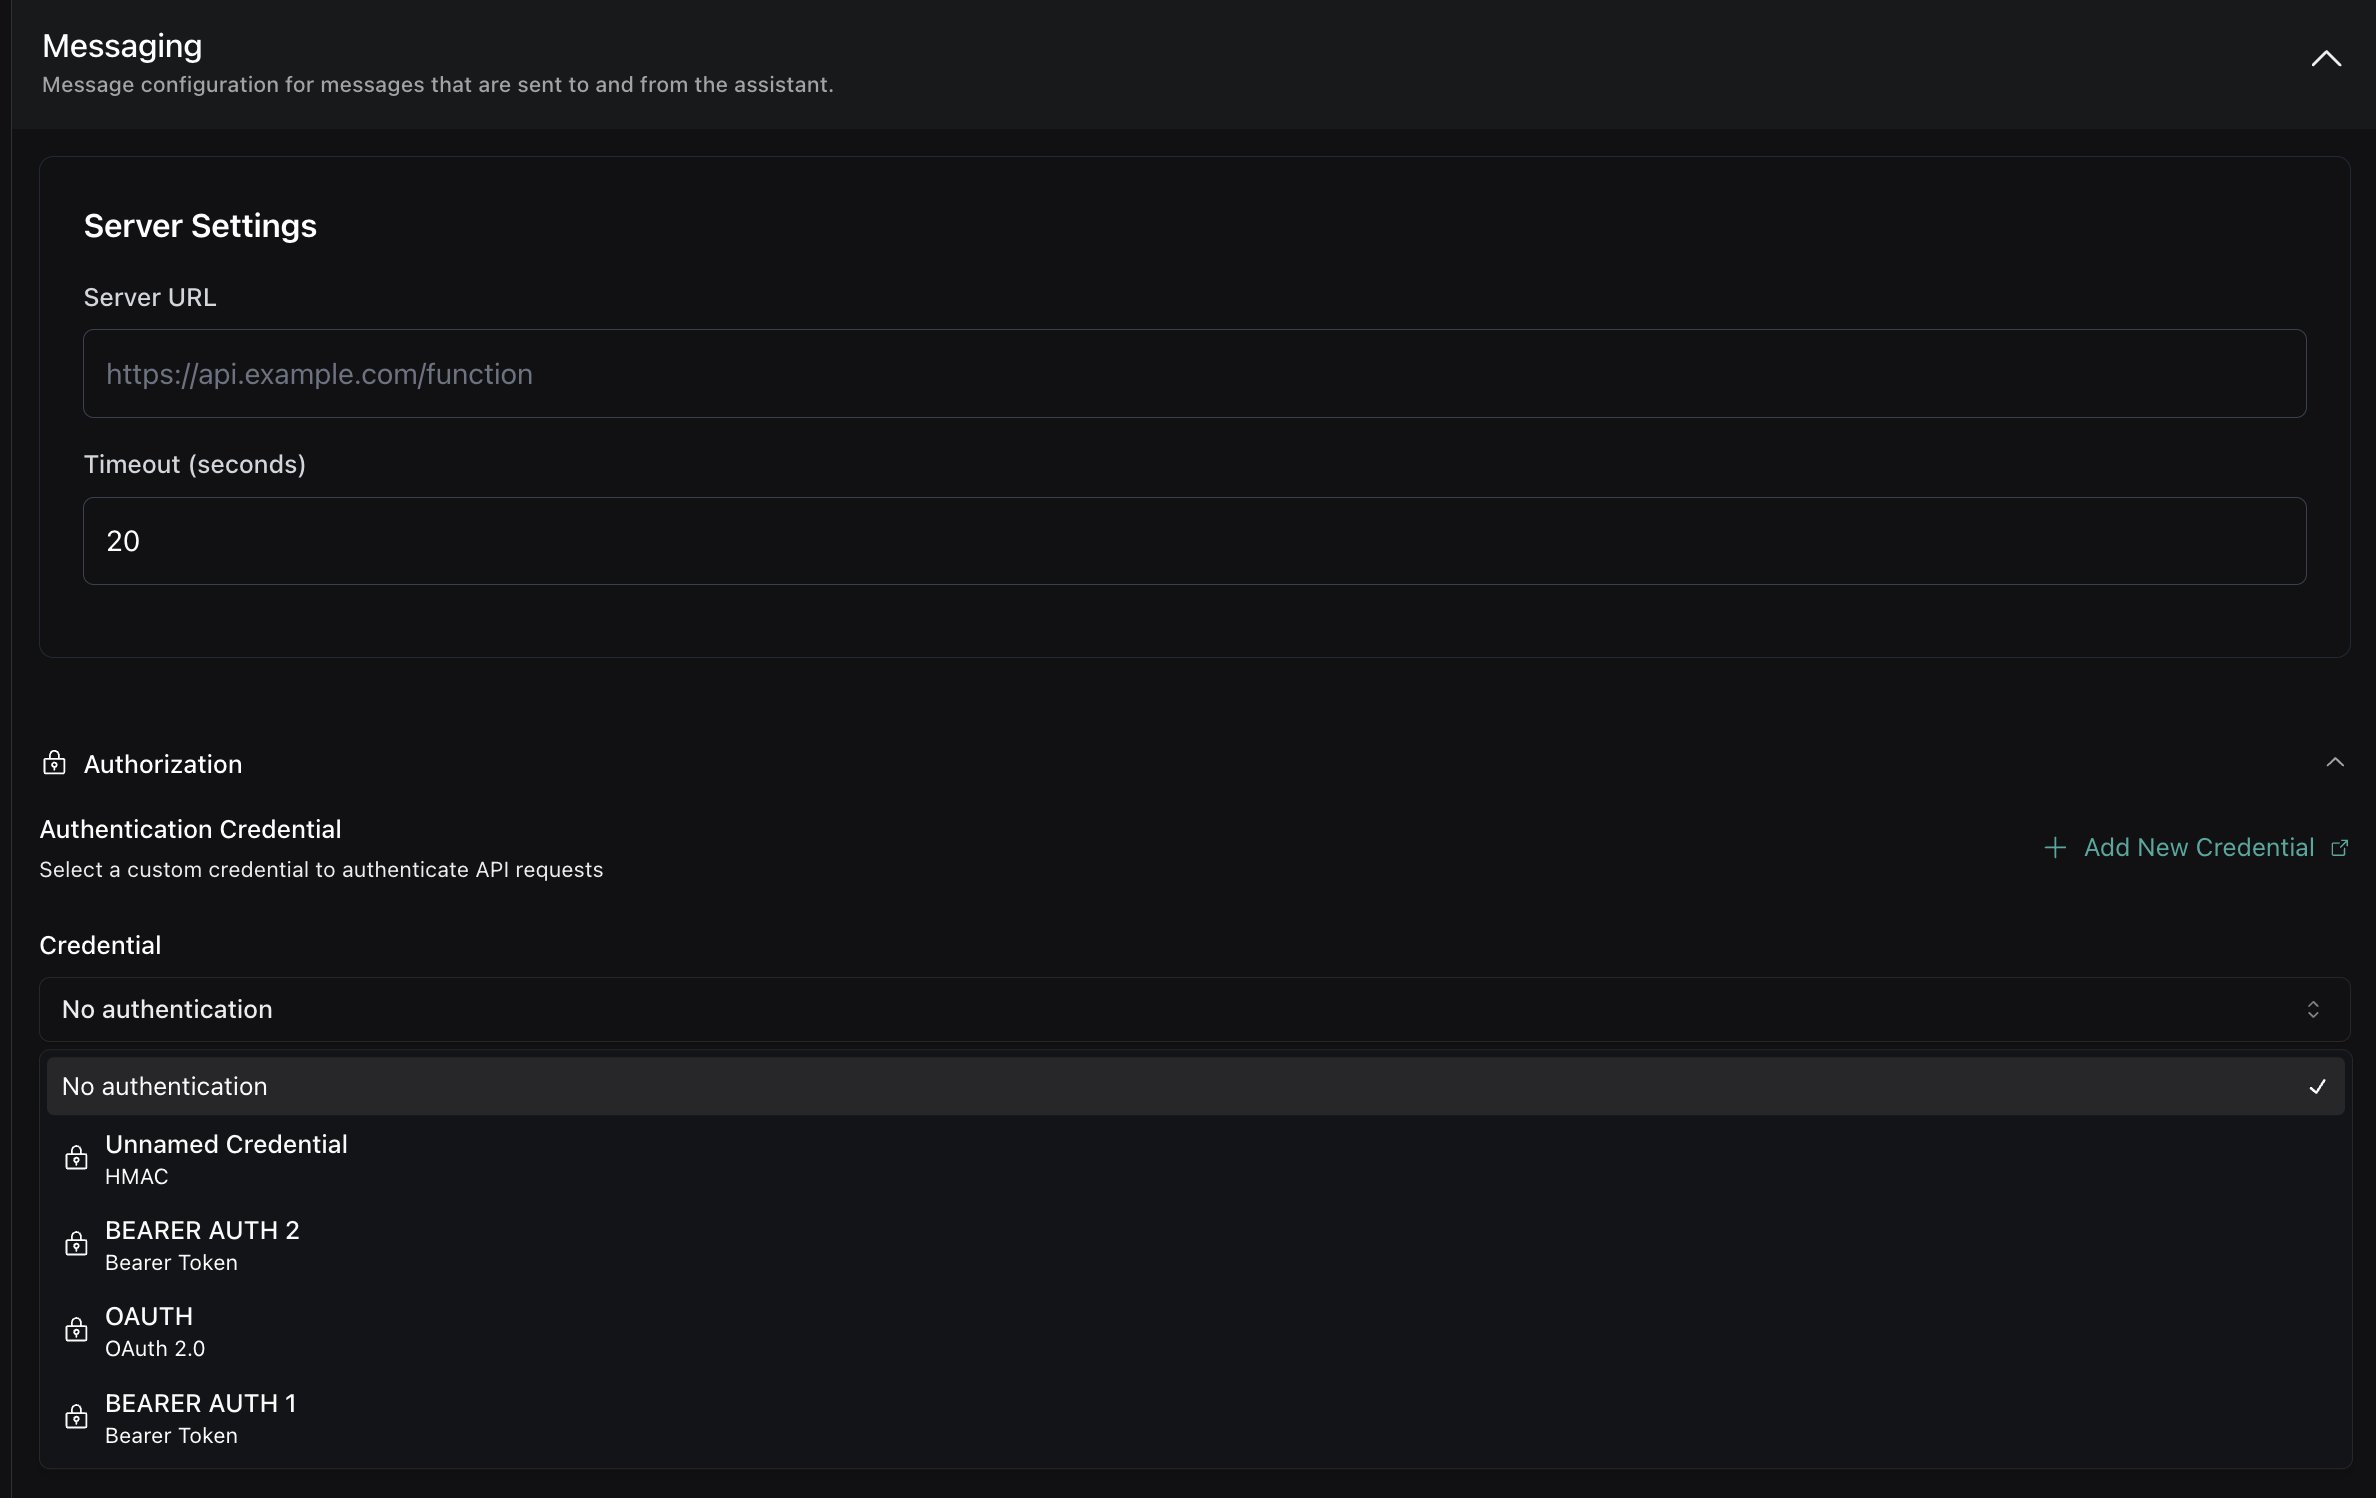
When configuring webhooks for your assistant, you can authenticate your server endpoints by creating Custom Credentials and referencing them using a credentialId. This approach provides better security, reusability, and centralized management of your authentication credentials.

Overview

Vapi now uses a credential-based authentication system where you:

  1. Create Custom Credentials through the dashboard
  2. Reference credentials by ID in your server configurations
  3. Reuse credentials across multiple assistants, phone numbers, and tools

This replaces the previous inline authentication approach and provides better security and management capabilities.

Quick start

1

Create a Custom Credential

In the Vapi dashboard, navigate to Custom Credentials and create a new credential:

  • Choose Bearer Token for simple API key authentication
  • Enter a descriptive name like “Production API Auth”
  • Add your API token
  • Save the credential and note the generated ID (e.g., cred_abc123)
2

Use the credential in your assistant

Reference the credential when configuring server webhooks:

1{
2 "name": "Support Assistant",
3 "server": {
4 "url": "https://api.yourcompany.com/webhook",
5 "credentialId": "cred_abc123"
6 },
7 "model": {
8 "provider": "openai",
9 "model": "gpt-4"
10 }
11}
3

Test your webhook

Make a test call - Vapi will now authenticate requests to your webhook using the configured credential.

Creating Custom Credentials

Dashboard Management

Custom Credentials are managed through the Vapi dashboard. Navigate to your organization settings to create and manage authentication credentials.

Custom Credentials management dashboard

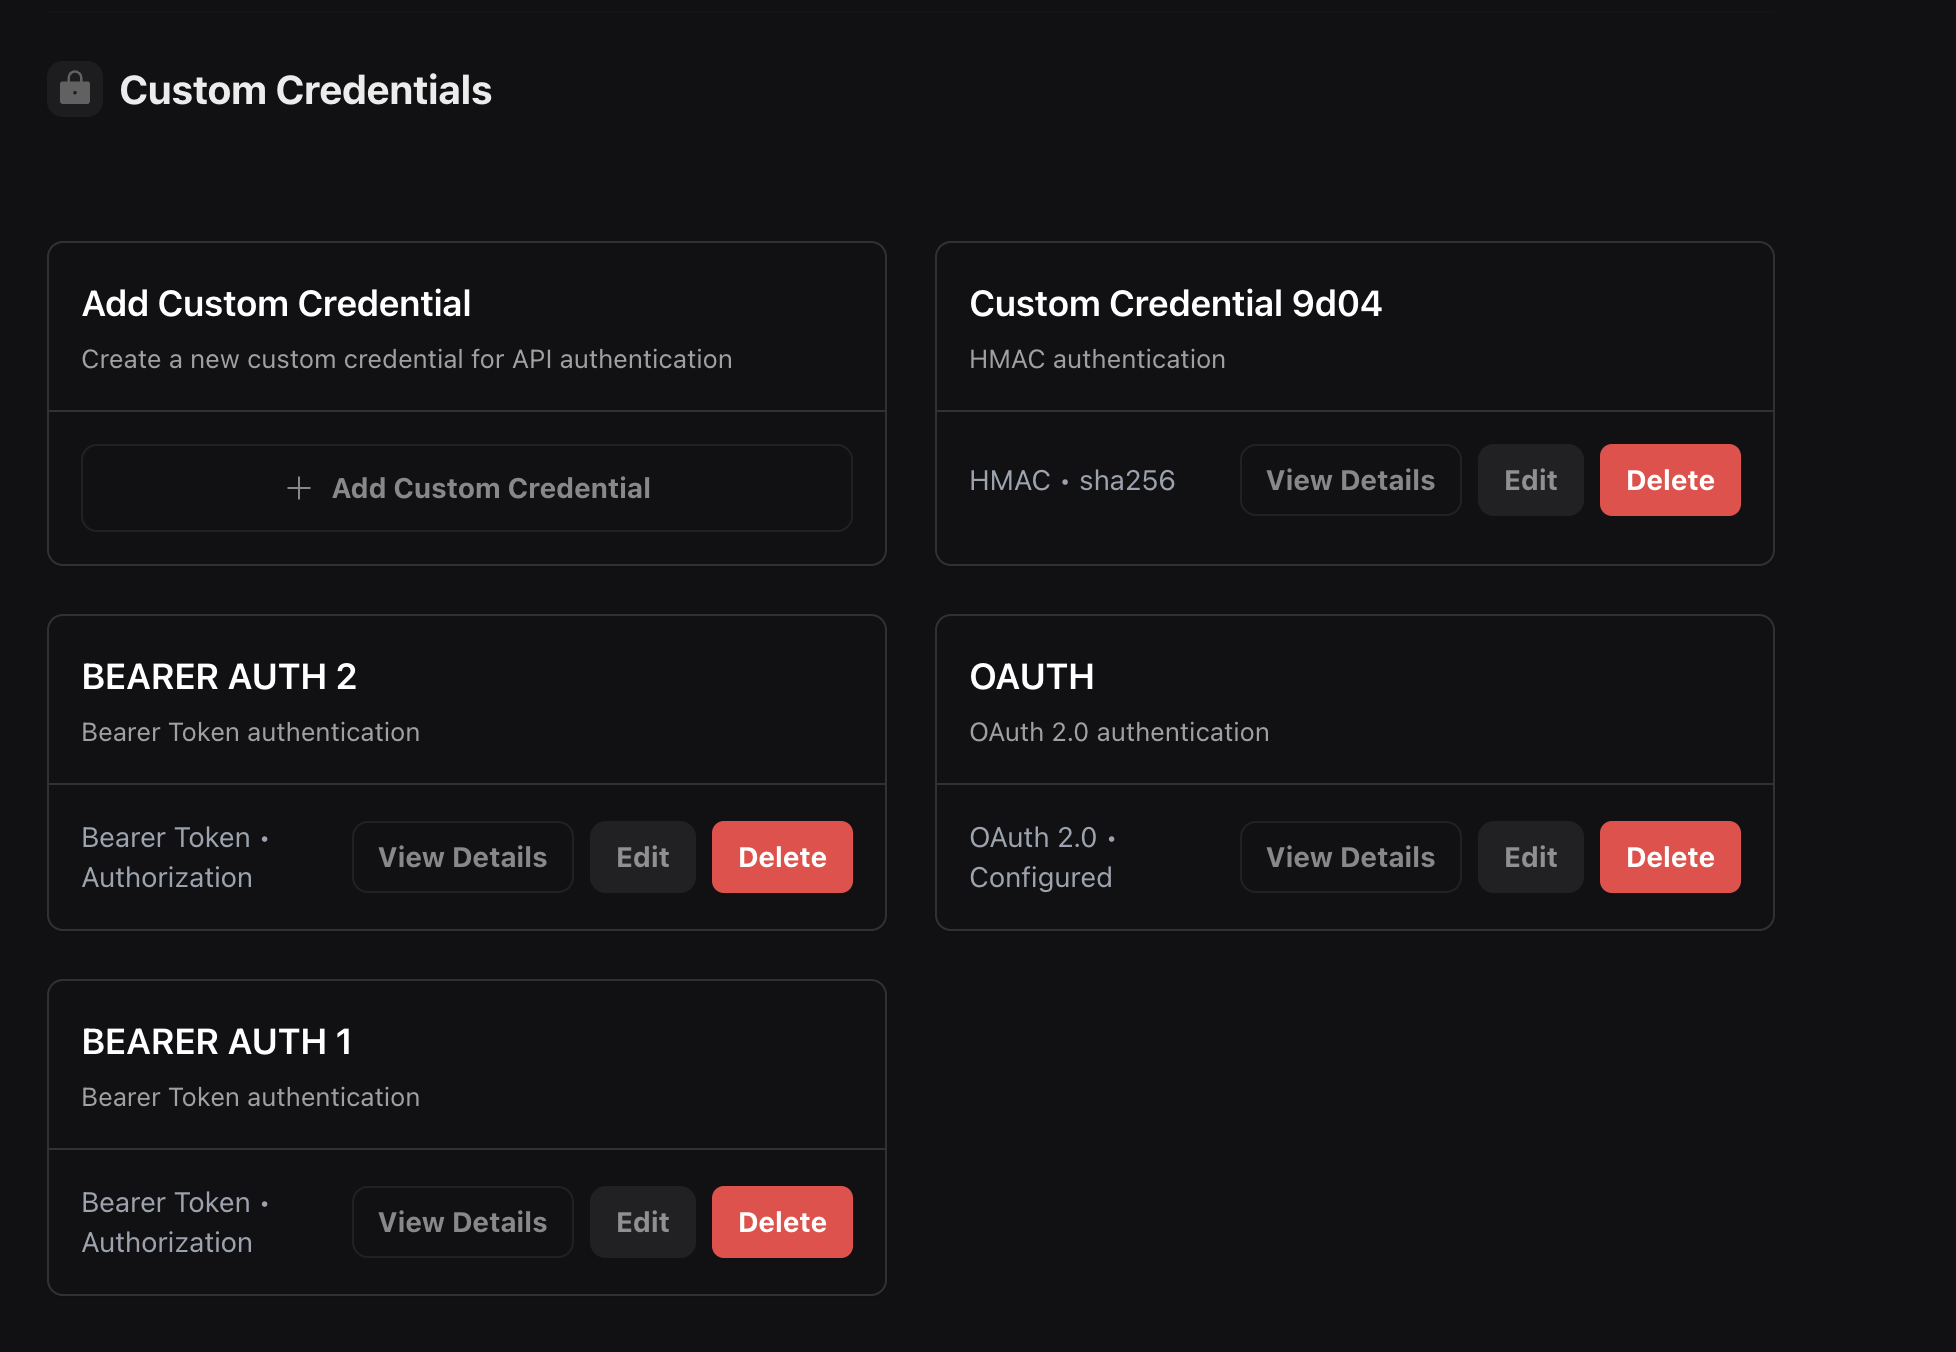
You can create different types of authentication credentials:

  • Bearer Token: Simple token-based authentication
  • OAuth 2.0: OAuth 2.0 client credentials flow
  • HMAC: HMAC signature-based authentication

Authentication Types

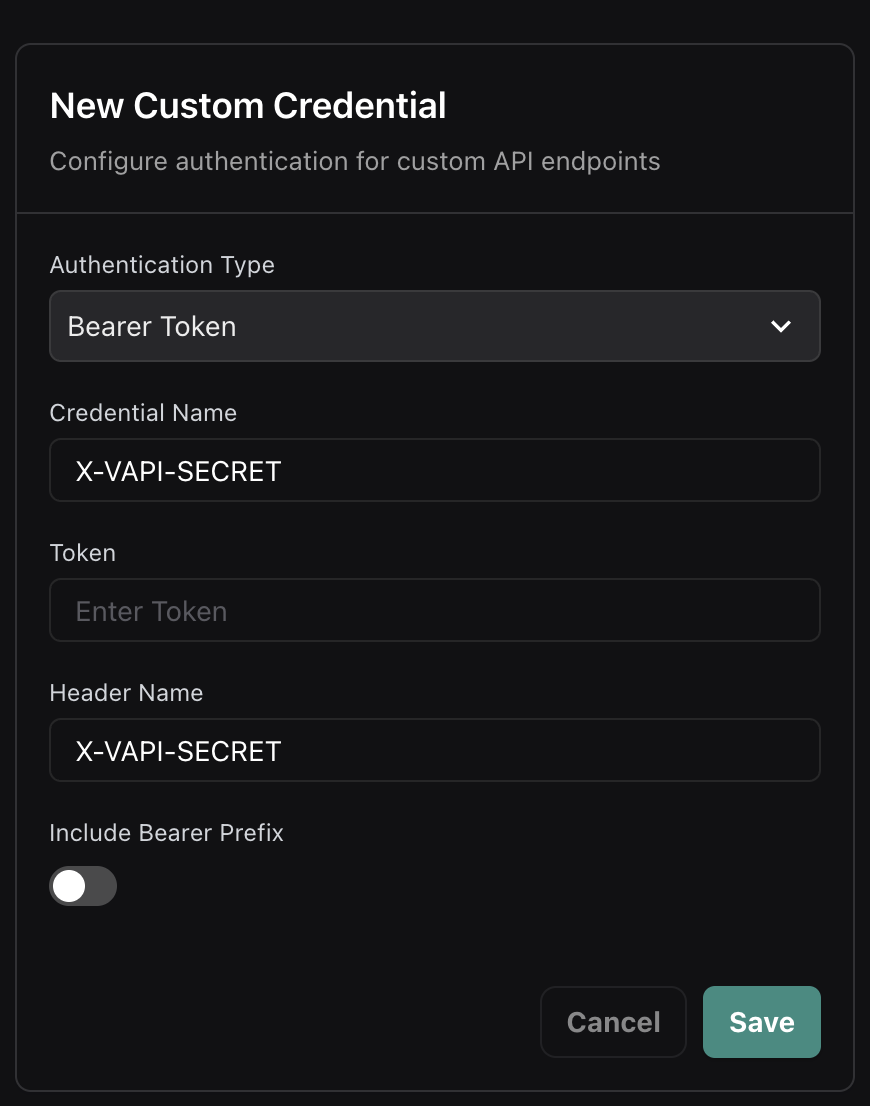
Bearer Token Authentication

The most common authentication method using a bearer token in the Authorization header.

1

Create Bearer Token Credential

In the dashboard, select “Bearer Token” as the authentication type and configure:

  • Credential Name: A descriptive name for the credential
  • Token: Your API token or secret
  • Header Name: The header to send the token in (default: Authorization)
  • Include Bearer Prefix: Whether to prefix the token with “Bearer ”
2

Use credential in server configuration

Reference the credential by its ID in your server configuration:

1{
2 "server": {
3 "url": "https://your-server.com/webhook",
4 "credentialId": "cred_abc123"
5 }
6}
Creating a Bearer Token credential

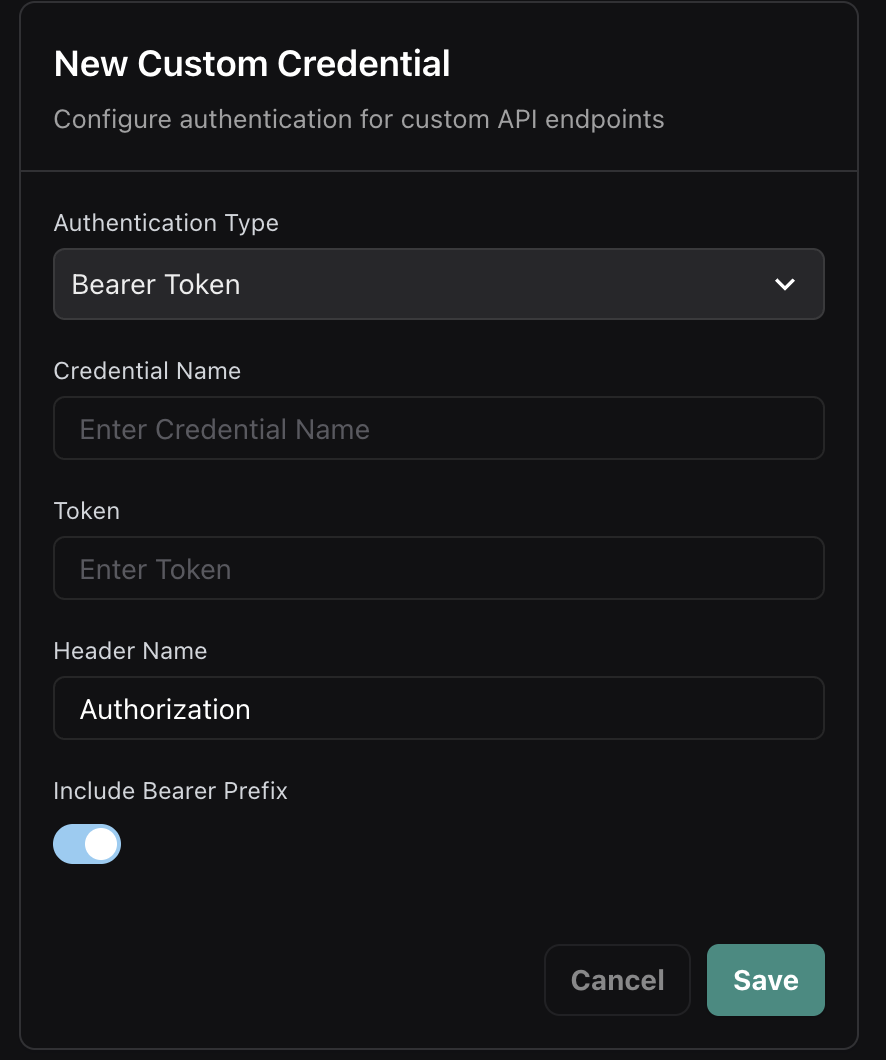
Standard Authorization Header

The most common Bearer Token configuration uses the standard Authorization header with the Bearer prefix:

1

Create standard Bearer Token credential

Configure a Bearer Token credential with:

  • Header Name: Authorization (default)
  • Include Bearer Prefix: Enabled (toggle on)
  • Token: Your API token or secret key
2

Use in server configuration

Reference this credential in your server setup - Vapi will send your token as Authorization: Bearer your-token.

1{
2 "server": {
3 "url": "https://api.example.com/webhook",
4 "credentialId": "cred_bearer_standard_123"
5 }
6}
3

Handle authentication in your server

Your server will receive the standard Authorization header:

1POST /webhook HTTP/1.1
2Host: api.example.com
3Authorization: Bearer your-api-token-here
4Content-Type: application/json

This is the recommended approach for modern API authentication and works with most authentication frameworks and libraries.

Legacy X-Vapi-Secret Support

For backward compatibility with existing implementations, you can configure a Bearer Token credential to use the X-Vapi-Secret header (matching the previous inline secret field behavior):

1

Create X-Vapi-Secret credential

Configure a Bearer Token credential with:

  • Header Name: X-Vapi-Secret (instead of Authorization)
  • Include Bearer Prefix: Disabled (toggle off)
  • Token: Your secret token value
2

Use in server configuration

Reference this credential in your server setup - Vapi will send your token in the X-Vapi-Secret header exactly like the previous inline behavior.

X-Vapi-Secret Bearer Token credential configuration

OAuth 2.0 Authentication

For OAuth 2.0 protected endpoints, configure client credentials flow with automatic token refresh.

1

Create OAuth 2.0 Credential

Select “OAuth 2.0” as the authentication type and configure:

  • Credential Name: A descriptive name for the credential
  • Token URL: Your OAuth token endpoint
  • Client ID: OAuth client identifier
  • Client Secret: OAuth client secret
  • Scope: Optional scopes to request
2

Reference in server configuration

Use the credential ID in your server setup:

1{
2 "server": {
3 "url": "https://your-server.com/webhook",
4 "credentialId": "cred_oauth_xyz789"
5 }
6}
OAuth 2.0 credential configuration

OAuth 2.0 Flow

  1. Vapi makes a token request to your OAuth endpoint with client credentials
  2. Your server validates the credentials and returns an access token
  3. Vapi includes the access token in the Authorization header for webhook requests
  4. When tokens expire, Vapi automatically requests new ones

Token Response Format

Your OAuth server should return:
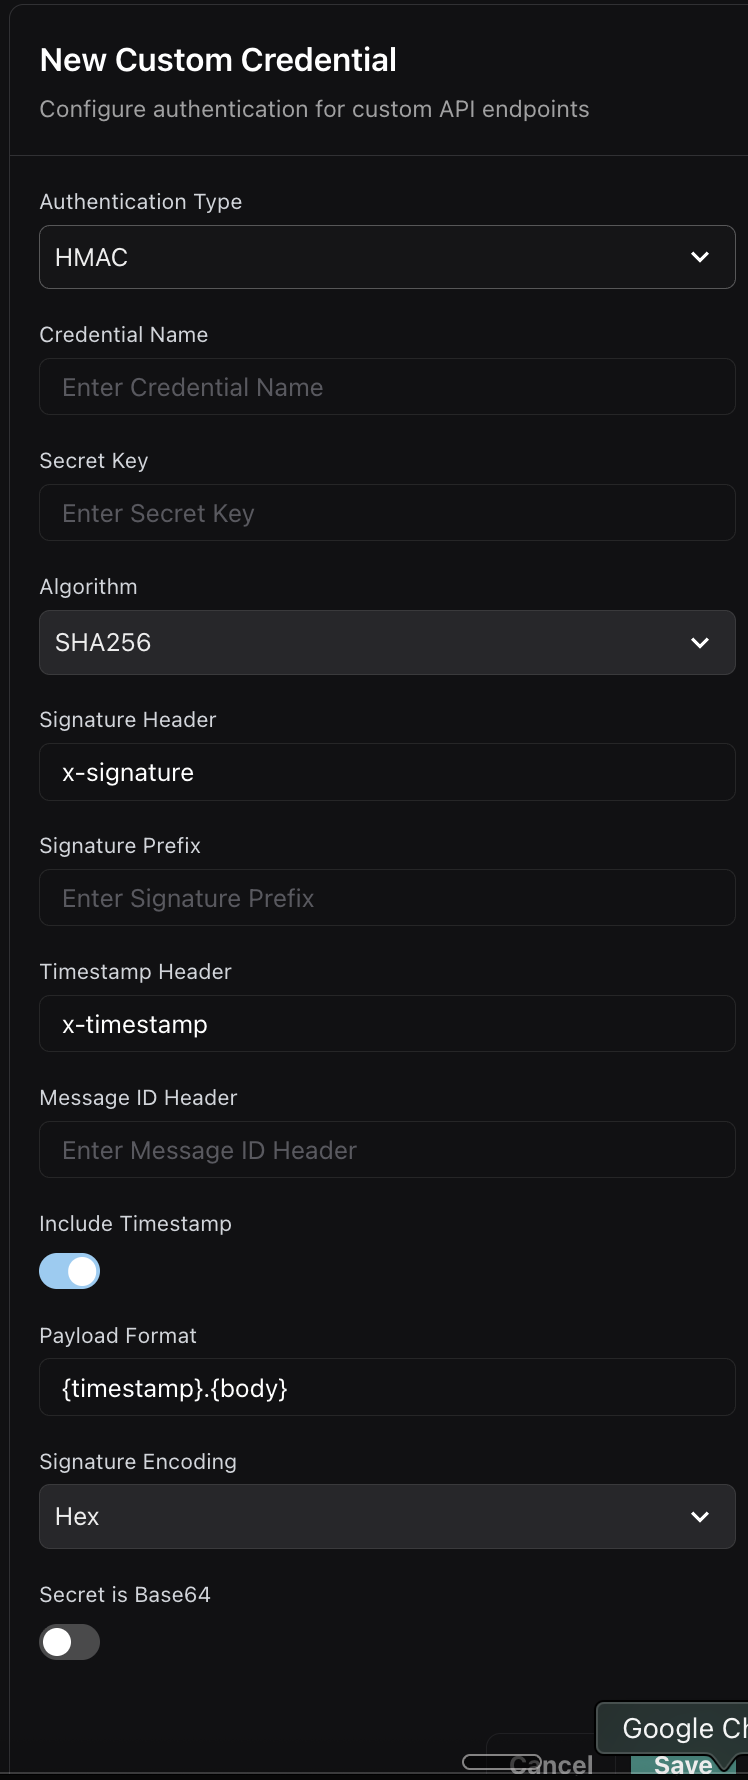
1{
2 "access_token": "eyJhbGciOiJIUzI1NiIsInR5cCI6IkpXVCJ9...",
3 "token_type": "Bearer",
4 "expires_in": 3600
5}

HMAC Authentication

For maximum security, use HMAC signature-based authentication to verify request integrity.

1

Create HMAC Credential

Select “HMAC” as the authentication type and configure:

  • Credential Name: A descriptive name for the credential
  • Secret Key: Your HMAC secret key
  • Algorithm: Hash algorithm (SHA256, SHA1, etc.)
  • Signature Header: Header name for the signature (e.g., x-signature)
  • Timestamp Header: Optional timestamp header for replay protection
  • Payload Format: How to format the payload for signing
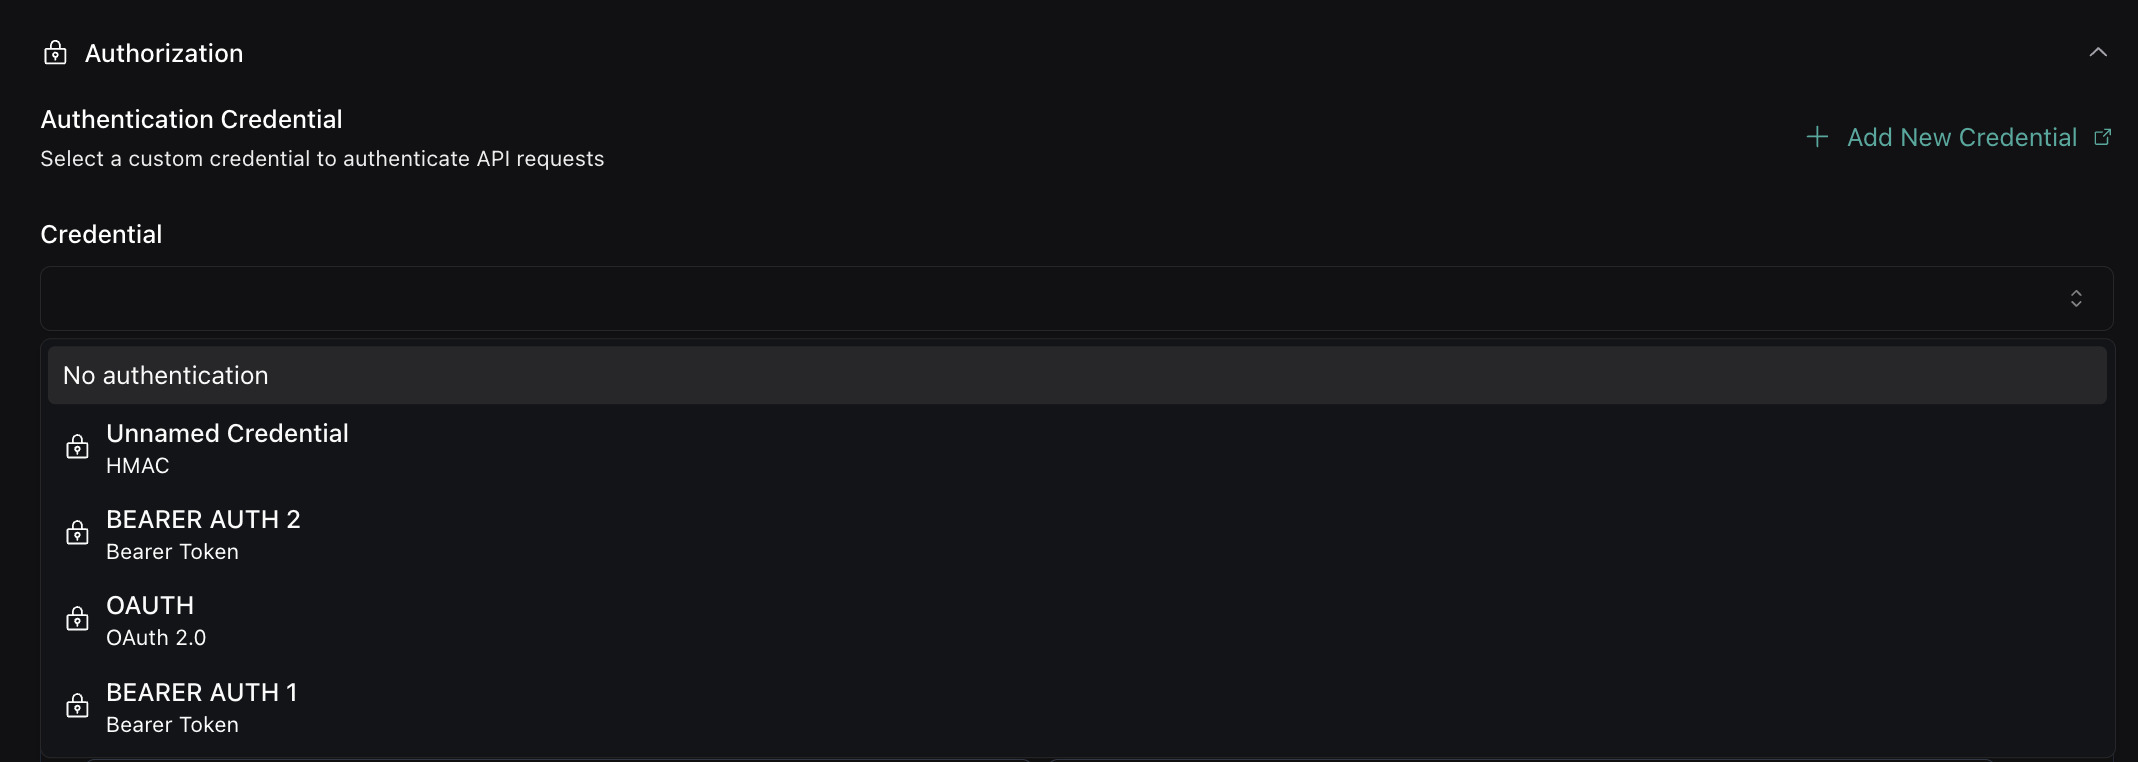
2

Use credential in server configuration

Reference the HMAC credential:

1{
2 "server": {
3 "url": "https://your-server.com/webhook",
4 "credentialId": "cred_hmac_456"
5 }
6}
HMAC credential configuration

Using Credentials

In Assistant Configuration

Reference credentials in your assistant’s server configuration:

1{
2 "server": {
3 "url": "https://api.example.com/webhook",
4 "credentialId": "cred_bearer_auth_123"
5 }
6}
Credential selection in assistant server configuration

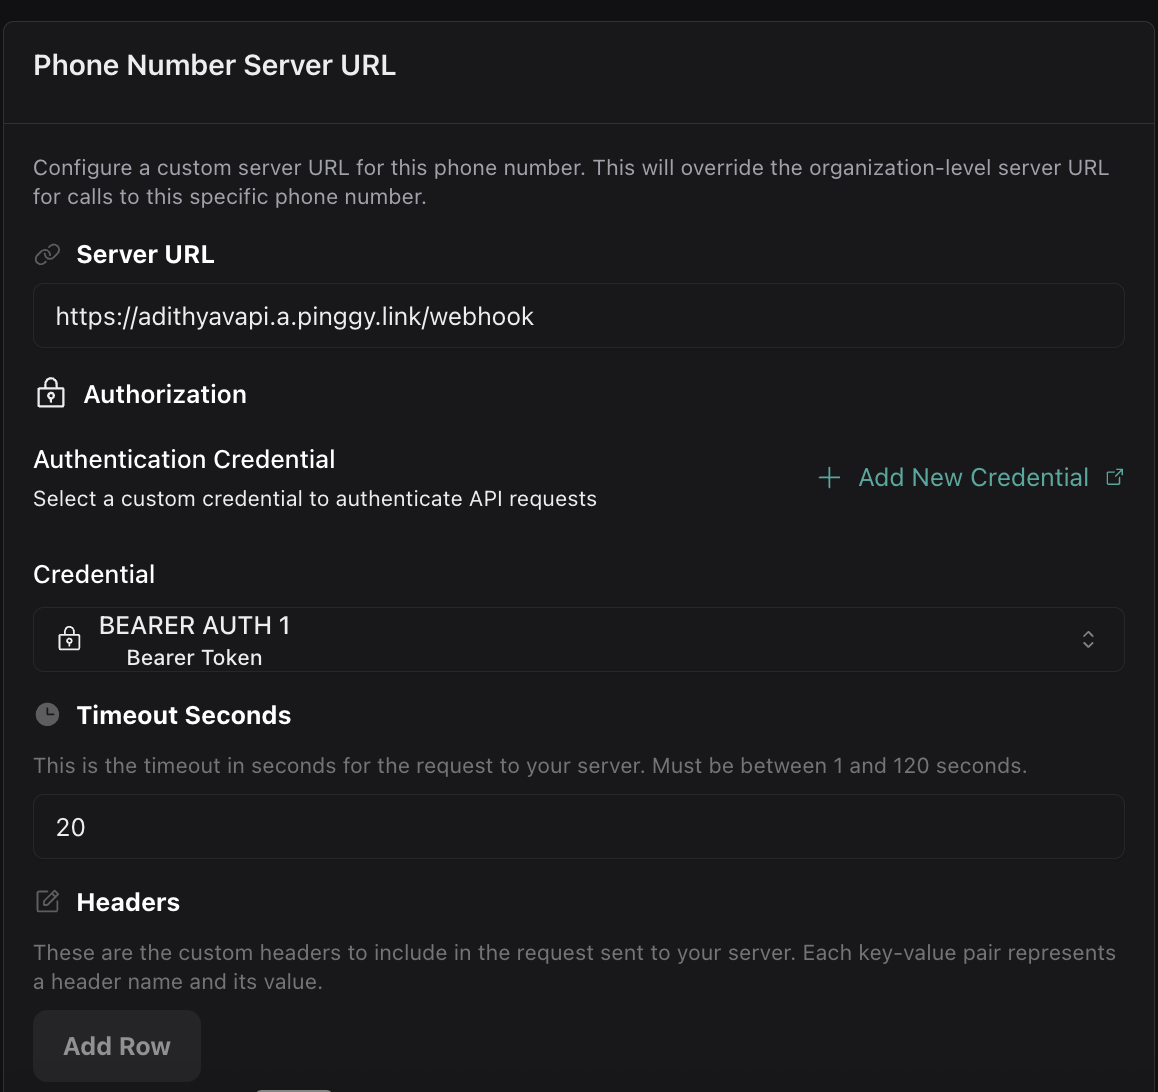
In Phone Number Configuration

Assign credentials to phone numbers for incoming call authentication:

1{
2 "phoneNumber": "+1234567890",
3 "server": {
4 "url": "https://api.example.com/calls",
5 "credentialId": "cred_oauth_456"
6 }
7}
Credential selection in phone number server configuration

In Tool Configuration

Secure your function tool endpoints with credentials:

1{
2 "type": "function",
3 "function": {
4 "name": "get_weather",
5 "description": "Get current weather",
6 "parameters": {
7 "type": "object",
8 "properties": {
9 "location": { "type": "string" }
10 }
11 }
12 },
13 "server": {
14 "url": "https://api.example.com/weather",
15 "credentialId": "cred_hmac_789"
16 }
17}

Credential Management

Dashboard Features

The Custom Credentials dashboard provides:

  • Credential Creation: Create new authentication credentials
  • Credential Editing: Modify existing credential configurations
  • Credential Deletion: Remove unused credentials
  • Usage Tracking: See where credentials are being used
Credential selection in server configuration

Best Practices

Credential Naming: Use descriptive names like “Production API Key” or “Staging OAuth” to easily identify credentials.

Credential Rotation: Regularly rotate credentials for enhanced security. Update the credential in the dashboard without changing your configurations.

Credential Security: Store credential secrets securely. Once created, secrets are encrypted and cannot be viewed in the dashboard.

Migration from Inline Authentication

If you’re currently using inline authentication, migrate to the credential system:

1

Create equivalent credentials

For each inline authentication configuration, create a matching Custom Credential in the dashboard:

  • For secret field: Create a Bearer Token credential with header X-Vapi-Secret and no Bearer prefix (see Legacy X-Vapi-Secret Support)
  • For headers field: Create a Bearer Token credential with the appropriate header name
  • For OAuth configurations: Create an OAuth 2.0 credential
2

Update configurations

Replace inline authentication with credentialId references:

Before (inline secret):

1{
2 "server": {
3 "url": "https://api.example.com/webhook",
4 "secret": "your-secret-token"
5 }
6}

After (credential reference):

1{
2 "server": {
3 "url": "https://api.example.com/webhook",
4 "credentialId": "cred_x_vapi_secret_123"
5 }
6}

Your server will continue receiving the same X-Vapi-Secret header with identical behavior.

3

Test and deploy

Verify that your webhooks continue working with the new credential system. The authentication behavior should be identical to your previous inline configuration.

Common Use Cases

Single Credential for Multiple Resources

Reuse the same credential across different components:

Shared Credential Usage
1{
2 "assistant": {
3 "server": {
4 "url": "https://api.yourcompany.com/assistant-webhook",
5 "credentialId": "cred_production_api_123"
6 }
7 },
8 "phoneNumber": {
9 "server": {
10 "url": "https://api.yourcompany.com/call-webhook",
11 "credentialId": "cred_production_api_123"
12 }
13 },
14 "tools": [
15 {
16 "type": "function",
17 "function": {
18 "name": "get_user_info"
19 },
20 "server": {
21 "url": "https://api.yourcompany.com/user-info",
22 "credentialId": "cred_production_api_123"
23 }
24 }
25 ]
26}

Environment-Specific Credentials

Use different credentials for staging and production:

1{
2 "server": {
3 "url": "https://staging-api.yourcompany.com/webhook",
4 "credentialId": "cred_staging_api_456"
5 }
6}

Service-Specific Credentials

Use different credentials for different services:

Multiple Service Credentials
1{
2 "assistant": {
3 "server": {
4 "url": "https://auth.yourcompany.com/webhook",
5 "credentialId": "cred_auth_service_789"
6 }
7 },
8 "tools": [
9 {
10 "type": "function",
11 "function": {
12 "name": "payment_processing"
13 },
14 "server": {
15 "url": "https://payments.yourcompany.com/process",
16 "credentialId": "cred_payment_service_321"
17 }
18 },
19 {
20 "type": "function",
21 "function": {
22 "name": "user_management"
23 },
24 "server": {
25 "url": "https://users.yourcompany.com/manage",
26 "credentialId": "cred_user_service_654"
27 }
28 }
29 ]
30}

Next steps

Now that you have authentication configured: