Appointment scheduling workflow

Build an AI receptionist workflow that schedules, reschedules, and cancels appointments using Vapi workflows.

Overview

Build an AI-powered appointment scheduling workflow that handles inbound calls for booking, rescheduling, and canceling appointments. The workflow uses visual nodes to create branching logic, integrates with calendar systems, checks availability in real-time, and sends confirmation messages.

What You’ll Build:

  • Visual workflow with branching appointment logic
  • Real-time calendar integration and availability checking
  • Customer database with automated confirmations
  • Global nodes for error handling and validation
  • 24/7 phone booking with conditional routing

Prerequisites

  • A Vapi account.
  • A Google Calendar account (or other calendar service).

Scenario

We will be creating an appointment scheduling workflow for Tony’s Barbershop, a traditional barbershop that wants to automate their phone booking process with sophisticated branching logic to handle different appointment scenarios.
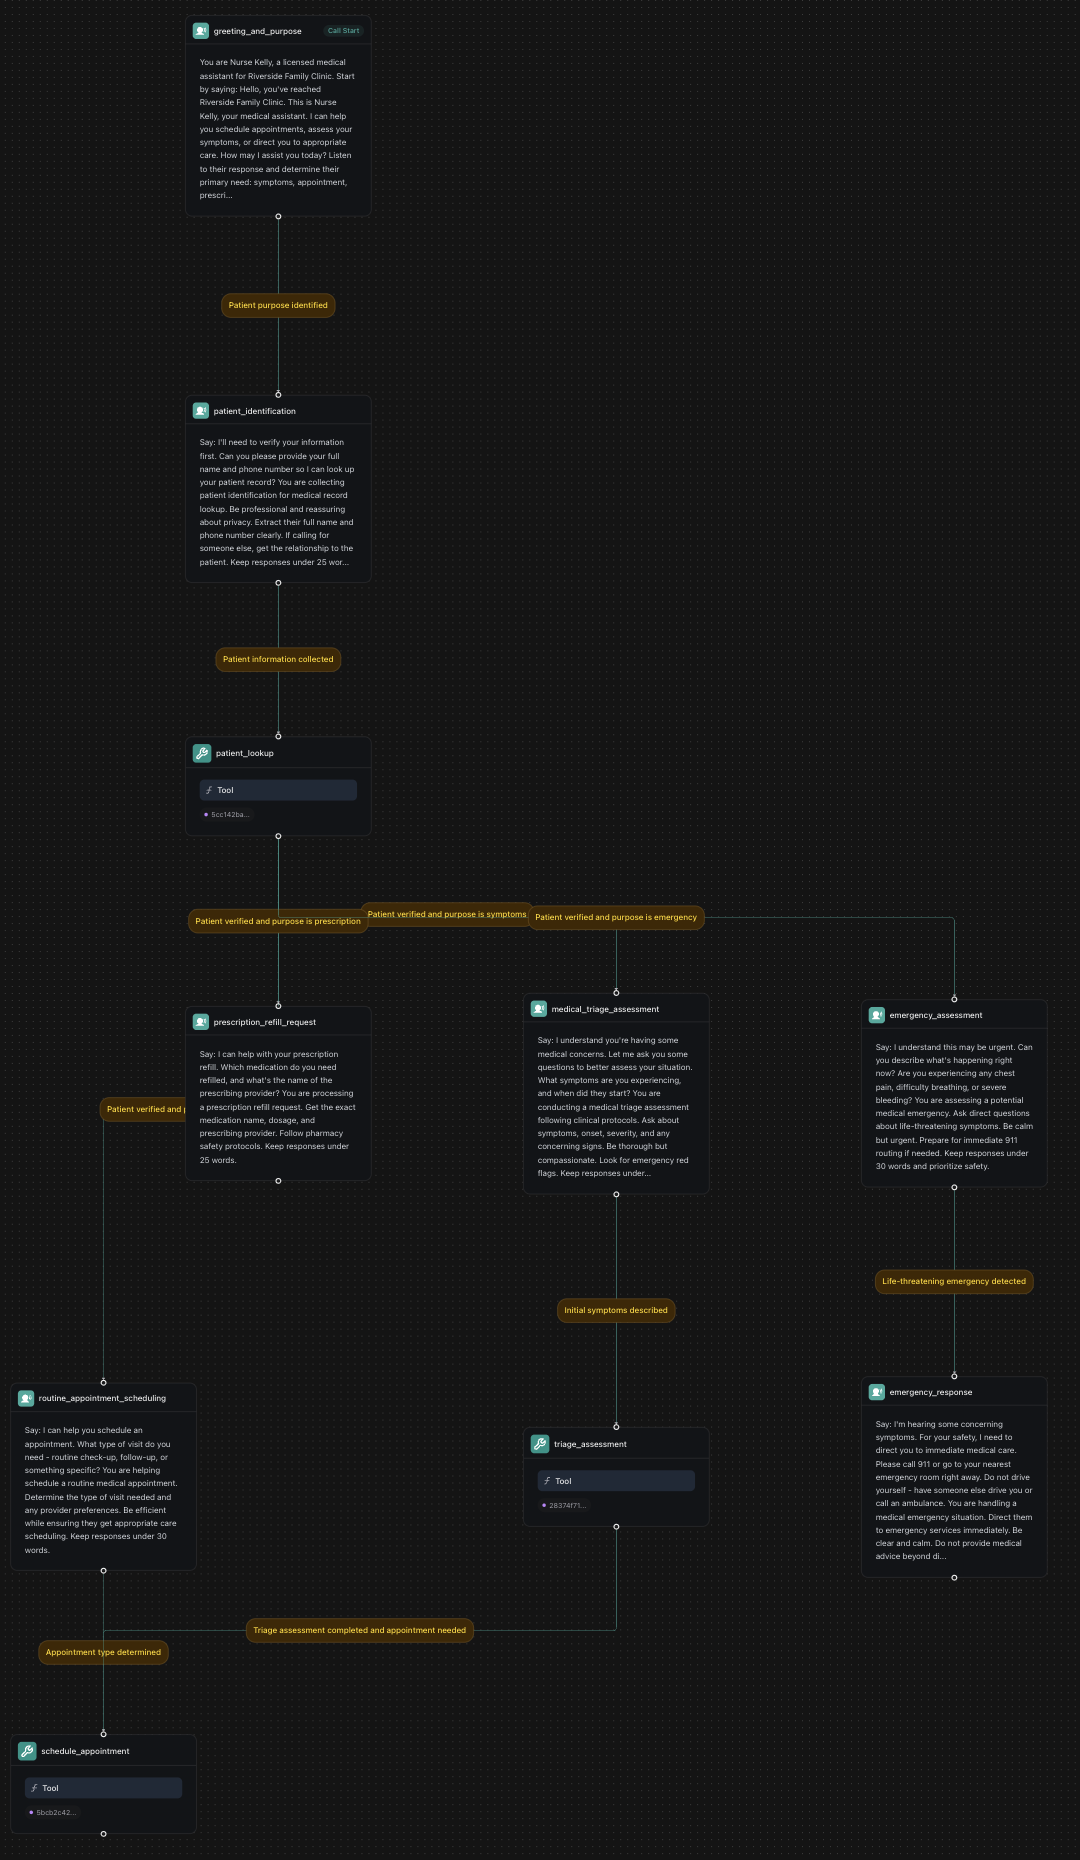
Final Workflow

Barbershop appointment scheduling workflow showing conversation nodes, tool integrations, and conditional routing
Complete appointment scheduling workflow with branching logic for booking, rescheduling, and canceling appointments

1. Create a Knowledge Base

3

Upload the spreadsheets

  • Click Choose file. Upload all three CSV files: services.csv, customers.csv, and appointments.csv.
  • Note the file IDs. We’ll need them later to create tools.

2. Create a Workflow

1

Open the Vapi Dashboard

Go to dashboard.vapi.ai and log in to your account.

3

Create a new workflow

  • Click Create Workflow.
  • Enter workflow name: Barbershop Appointment Workflow.
  • Select the default template (includes Call Start node).
  • Click “Create Workflow”.
4

Configure Workflow Settings

  • Configure workflow variables for customer data and appointment information

3. Build the Workflow

You’ll start with a default template that includes a “Call Start” node. We’ll modify the existing nodes and add new ones to create our appointment scheduling workflow.

1

Configure the Initial Conversation Node

The default template includes a conversation node. Click on it and configure:

First Message
Hello! Thank you for calling Tony's Barbershop. This is Sarah, your booking assistant. I can help you schedule, reschedule, or cancel appointments. How can I help you today?
Prompt
You are Sarah, the friendly booking assistant for Tony's Barbershop.
Listen to the customer's response and determine their intent:
- "schedule" for new appointments
- "reschedule" for changing existing appointments
- "cancel" for canceling appointments
- "status" for checking appointment details
- "other" for anything else
Keep responses under 35 words. Ask clarifying questions if intent is unclear.

Extract Variables:

  • Variable: intent
  • Type: String
  • Description: The customer's primary intent
  • Enum Values: schedule, reschedule, cancel, status, other
2

Add Customer Verification Node

Click the + button below the greeting node and add a new Conversation node:

Condition
Intent identified
First Message
Now I need to verify your information. Can you please provide your phone number or full name so I can look up your account?
Prompt
You are collecting customer identification information to look them up in the system.
If they provide a phone number, extract it in a clean format (numbers only).
If they provide a name, extract their full name.
Be friendly and reassuring about privacy. Keep responses under 25 words.

Extract Variables:

  • Variable: phone_number
  • Type: String
  • Description: Customer's phone number if provided

  • Variable: customer_name
  • Type: String
  • Description: Customer's full name if provided
3

Add Customer Lookup Tool Node

Add a Tool node:

Condition
Customer information collected

Select Tool: Choose your pre-configured customer lookup tool from the dropdown. This tool will use the extracted phone_number and customer_name variables to find the customer in your database.

4

Add Intent Routing Logic

Create branching paths based on the customer’s intent. Add multiple conversation nodes:

Schedule New Appointment Node:

Condition
Customer verified and intent is schedule
First Message
Great! I can help you schedule a new appointment. What type of service would you like? We offer haircuts, beard trims, shampoo and styling, and full grooming packages.
Prompt
You are helping the customer schedule a new appointment.
Listen for the service they want and any preferred dates/times they mention.
Be enthusiastic and helpful. Keep responses under 30 words.
If they're unsure about services, briefly describe each option.

Reschedule Appointment Node:

Condition
Customer verified and intent is reschedule
First Message
I can help you reschedule your appointment. Let me first look up your current booking details.
Prompt
You are helping the customer reschedule an existing appointment.
Be understanding and accommodating. Look up their current appointment first.
Keep responses under 25 words while being empathetic.

Cancel Appointment Node:

Condition
Customer verified and intent is cancel
First Message
I can help you cancel your appointment. Let me look up your current booking to confirm the details.
Prompt
You are helping the customer cancel their appointment.
Be understanding and offer to reschedule instead if appropriate.
Confirm cancellation details before proceeding. Keep responses under 25 words.
5

Add Global Error Handling Node

Create a global conversation node that checks for errors after every step:

Condition
Customer confused or error detected
First Message
I apologize for any confusion. Let me transfer you to one of our human staff members who can better assist you. Please hold for just a moment.
Prompt
You are handling an error or confused customer situation.
Be apologetic and professional. Prepare them for transfer to human staff.
Keep the message brief and reassuring.

This global node will activate whenever there’s an error or the customer becomes frustrated, regardless of where they are in the workflow.

6

Add Availability Checking Flow

For the schedule appointment flow, add these nodes:

Service Selection Node (Conversation):

Condition
Service type mentioned or requested
First Message
Perfect! And when would you prefer to come in? What date and time work best for you?
Prompt
You are collecting appointment preferences for scheduling.
Listen for specific dates, times, or general preferences like "morning" or "next week".
Be flexible and offer to check availability. Keep responses under 25 words.

Extract Variables:

  • Variable: service_type
  • Type: String
  • Description: Type of service requested

  • Variable: preferred_date
  • Type: String
  • Description: Customer's preferred date

  • Variable: preferred_time
  • Type: String
  • Description: Customer's preferred time

Availability Check Tool Node:

Condition
Preferences collected

Select Tool: Choose “Check Availability” from the pre-defined calendar tools

  • This will automatically check available slots based on the extracted preferences

Availability Results Node (Conversation):

Condition
Availability checked
First Message
Based on your preferences, here are the available time slots. Which one works best for you?
Prompt
You are presenting available appointment times to the customer.
Present 2-3 options clearly with dates and times.
If their preferred time isn't available, offer the closest alternatives.
Be helpful and accommodating. Keep responses under 35 words.
7

Add Confirmation and Booking Flow

Booking Confirmation Node (Conversation):

Condition
Time slot selected
First Message
Perfect! Let me confirm your appointment details: [service] on [date] at [time]. Is this correct?
Prompt
You are confirming appointment details before booking.
Read back the service type, date, and time clearly.
Wait for their confirmation before proceeding.
Be thorough but concise. Keep responses under 30 words.

Extract Variables:

  • Variable: confirmation_status
  • Type: String
  • Description: Whether customer confirms the appointment details

Create Appointment Tool Node:

Condition
Appointment details confirmed

Select Tool: Choose “Schedule Event” from the pre-defined calendar tools

  • This will book the appointment in your calendar system

Send Confirmation Node (Tool):

Condition
Appointment created successfully

Select Tool: Choose your pre-configured SMS/email confirmation tool

Completion Node (Conversation):

Condition
Confirmation sent
First Message
Great! Your appointment is confirmed. You'll receive a confirmation message shortly. Is there anything else I can help you with today?
Prompt
You are wrapping up a successful appointment booking.
Be friendly and offer additional assistance.
If they say no, prepare to end the call politely.
Keep responses under 25 words.
8

Add Transfer and Hangup Options

Transfer to Human Node:

Condition
Customer requests human assistance

Node Type: Transfer Call Phone to transfer to: +1-555-BARBER-1 (your barbershop number)

End Call Node:

Condition
Customer satisfied and no further assistance needed

Node Type: End Call First Message: Thank you for calling Tony's Barbershop. Have a great day!

  • Use when customer is satisfied and no further assistance needed

4. Configure Phone Number

2

Create or Import Phone Number

  • Click Create Phone Number for a new Vapi number, or
  • Click Import Phone Number to use your existing number from Twilio/Telnyx
3

Configure Inbound Settings

Workflow: Select your Barbershop Appointment Workflow

Advanced Settings:

  • Enable call recording for quality assurance
  • Set maximum call duration (e.g., 15 minutes)
  • Configure voicemail detection if needed
4

Test Your Phone Number

Call your Vapi phone number to test the complete workflow:

  • Test different appointment scenarios
  • Verify branching logic works correctly
  • Ensure global nodes trigger appropriately
  • Test error handling and recovery flows

Next Steps

Just like that, you’ve built an automated appointment scheduling workflow that can handle inbound calls, manage bookings, and provide 24/7 availability for your barbershop.

Consider reading the following guides to further enhance your workflow:

  • Custom Tools - Create custom tools for calendar integration and customer management.
  • Voice Formatting Plan - Configure speech formatting for clear appointment communication.
  • Dynamic Variables - Use variables to personalize appointment confirmations.