Clinic triage and scheduling workflow
Workflows will be retired on August 18, 2026. From August 19, 2026 onward, existing workflows will no longer run. You will no longer be able to create new workflows on the dashboard. Migrate existing workflows to Assistants or Squads before the retirement date to avoid disruption.
See the Squad - Clinic Triage & Scheduling equivalent.
Overview
Build an AI-powered clinic receptionist workflow that handles patient triage, appointment scheduling, and emergency routing using Vapi workflows with medical protocol compliance and safety monitoring.
What You’ll Build:
- Medical triage assessment with symptom-based routing
- Emergency detection with global safety protocols
- Provider scheduling with urgency prioritization
- Prescription refill processing with safety checks
Prerequisites
- A Vapi account.
- Medical triage protocols and guidelines.
- Healthcare provider scheduling system.
Scenario
We will be creating a triage and scheduling workflow for Riverside Family Clinic, a primary care practice that wants to improve patient access while ensuring appropriate care routing and emergency response through sophisticated workflow automation.
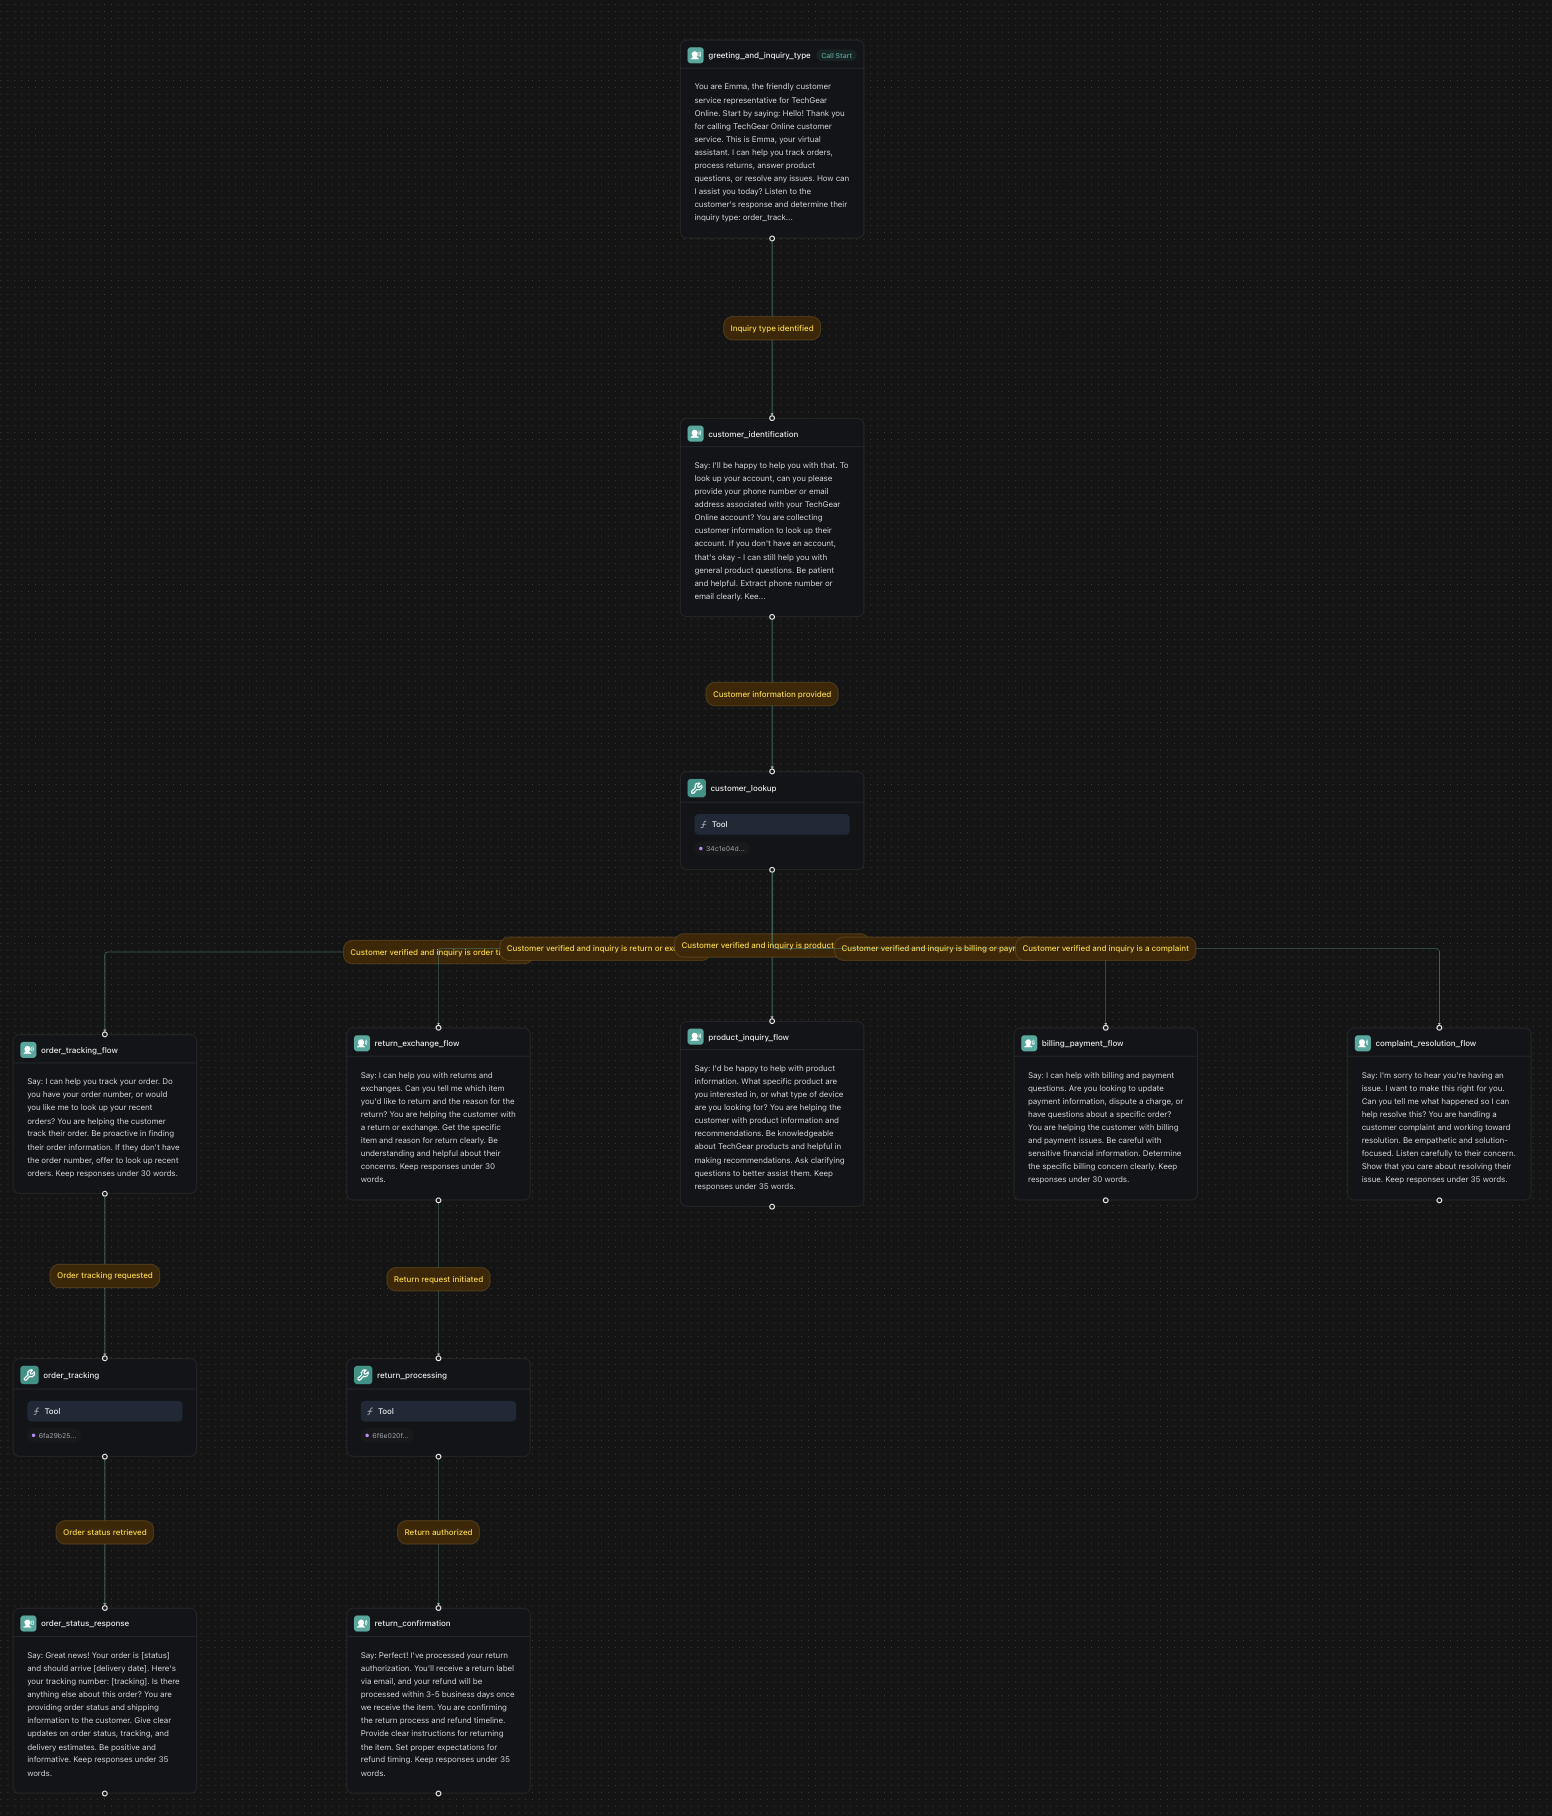
Final Workflow
1. Create a Knowledge Base
Dashboard
TypeScript (Server SDK)
Python (Server SDK)
cURL
2. Create Required Tools
Dashboard
TypeScript (Server SDK)
Python (Server SDK)
cURL
Before building the workflow, create the necessary tools in your dashboard:
Create Patient Lookup Tool
Click Create Tool and configure:
- Tool Name: “Patient Lookup”
- Tool Type: “Function”
- Function Name:
lookup_patient - Description: “Look up patient record by ID”
- Parameters:
patient_id(string, required): Patient’s ID number
- Server URL:
https://jsonplaceholder.typicode.com/users
This example uses JSONPlaceholder for demonstration. In production, replace with your EHR system API (Epic, Cerner, etc.).
Create Triage Assessment Tool
Create another tool:
- Tool Name: “Triage Assessment”
- Function Name:
conduct_triage - Description: “Assess patient symptoms and determine urgency level”
- Parameters:
symptoms(string): Description of patient symptomsonset(string): When symptoms startedseverity(string): Severity level (1-10)
- Server URL:
https://jsonplaceholder.typicode.com/posts
This example uses JSONPlaceholder for demonstration. Replace with your medical triage system in production.
Create Appointment Scheduling Tool
Create a third tool:
- Tool Name: “Schedule Appointment”
- Function Name:
schedule_appointment - Description: “Schedule patient appointments based on availability”
- Parameters:
patient_id(string): Patient identifierappointment_type(string): Type of appointment neededurgency_level(string): Urgency classification
- Server URL:
https://jsonplaceholder.typicode.com/posts
This example uses JSONPlaceholder for demonstration. In production, integrate with your appointment scheduling system.
3. Create a Workflow
Dashboard
TypeScript (Server SDK)
Python (Server SDK)
cURL
4. Build the Workflow
You’ll start with a default template that includes a “Call Start” node. We’ll modify the existing nodes and add new ones to create our medical triage and scheduling workflow.
Configure the Initial Conversation Node
The default template includes a conversation node. Click on it and configure:
Extract Variables:
- Variable:
call_purpose - Type:
String - Description:
Primary purpose of the patient's call - Enum Values:
emergency,medical_triage,appointment,prescription,general
Add Patient Verification Node
Click the + button below the greeting node and add a new Conversation node:
Extract Variables:
- Variable:
patient_id - Type:
String - Description:
Patient's ID number if provided
- Variable:
patient_name - Type:
String - Description:
Patient's full name if provided
- Variable:
date_of_birth - Type:
String - Description:
Patient's date of birth if provided
Add Patient Lookup Tool Node
Add a Tool node:
Select Tool: Choose your pre-configured patient lookup tool from the dropdown. This tool will use the extracted patient information to find their medical record.
Add Call Purpose Routing Logic
Create branching paths based on the patient’s call purpose. Add multiple conversation nodes:
Emergency Routing Node:
Medical Triage Node:
Appointment Scheduling Node:
Add Global Emergency Detection Node
Create a global node that monitors for emergency keywords throughout the call:
Node Name: emergency_detector
Global Node: enabled = true
Enter Condition: {{ emergency_keywords_detected == true or red_flag_symptoms == true }}
This global node will activate whenever emergency keywords are detected, regardless of where they are in the workflow.
Add Triage Assessment Flow
For the medical triage path, add these nodes:
Symptom Collection Node:
Node Name: collect_symptoms
Extract Variables:
- Variable:
symptom_details - Type:
String - Description:
Detailed symptom description
- Variable:
pain_scale - Type:
String - Description:
Pain level 1-10
- Variable:
symptom_duration - Type:
String - Description:
How long symptoms have been present
Triage Protocol Tool Node:
- Add a Tool node that calls triage protocol API with symptom data
Urgency Classification Node:
Node Name: classify_urgency
- Determine urgency level: emergency, urgent, semi-urgent, routine
- Route to appropriate care level
Add Provider Availability Flow
Provider Lookup Tool Node:
- Add a Tool node that checks available appointments based on urgency and specialty
Appointment Options Node:
Node Name: present_appointment_options
- Present available time slots to patient
- Use conditional logic based on urgency level
Appointment Confirmation Node:
Node Name: confirm_appointment
- Confirm appointment details and provide instructions
Add Emergency Routing Options
911 Routing Node:
Node Type: Transfer
Destination: 911
- Use for life-threatening emergencies
Urgent Care Transfer Node:
Node Type: Transfer
Destination: +1-555-URGENT-1 (urgent care line)
Nurse Line Transfer Node:
Node Type: Transfer
Destination: +1-555-NURSE-1 (triage nurse line)
End Call Node:
Node Type: Hangup
- Use when patient needs are resolved
5. Configure Phone Number
Dashboard
TypeScript (Server SDK)
Python (Server SDK)
cURL
Create or Import Phone Number
- Click
Create Phone Numberfor a new Vapi number, or - Click
Import Phone Numberto use your existing clinic number
Integrating with Real Systems
This example uses JSONPlaceholder for demonstration purposes. To integrate with your actual healthcare systems:
EHR System Integration
- Epic: Use Epic on FHIR APIs for patient data
- Cerner: Use Cerner SMART on FHIR APIs
- Allscripts: Use Allscripts Developer Program APIs
Appointment Scheduling
- Epic MyChart: Epic APIs
- Cerner PowerChart: Cerner Scheduling APIs
- athenahealth: athenaCollector API
Medical Decision Support
- IBM Watson Health: Watson for Oncology
- Microsoft Healthcare Bot: Healthcare Bot Service
- Infermedica: Symptom Checker API
HIPAA Compliance: When integrating with real healthcare systems, ensure all integrations comply with HIPAA regulations and your organization’s privacy policies.
Next Steps
Just like that, you’ve built a medical triage and scheduling workflow that can handle patient calls, assess symptoms, and route to appropriate care levels with 24/7 availability.
Consider reading the following guides to further enhance your workflow:
- Custom Tools - Create custom tools for EHR integration and medical protocols.
- Custom Voices - Customize your assistant’s voice for medical professionalism.
- HIPAA Compliance - Ensure your medical workflows meet HIPAA requirements.