E-commerce order management workflow
E-commerce order management workflow
Workflows will be retired on August 18, 2026. From August 19, 2026 onward, existing workflows will no longer run. You will no longer be able to create new workflows on the dashboard. Migrate existing workflows to Assistants or Squads before the retirement date to avoid disruption.
See the Squad - E‑commerce Order Management equivalent.
Overview
Build an AI-powered e-commerce customer service workflow that handles order inquiries, returns, and customer support using Vapi workflows with tier-based routing and global monitoring for comprehensive automation.
What You’ll Build:
- Order tracking with real-time status updates
- Return processing with automated eligibility verification
- Customer tier routing (VIP, Premium, Standard)
- Global fraud detection and sentiment monitoring
Prerequisites
- A Vapi account.
- E-commerce platform or order management system.
- Shipping carrier integrations.
Scenario
We will be creating an order management workflow for TechGear Online, an electronics retailer that wants to automate customer service calls and improve order resolution times through sophisticated workflow automation.
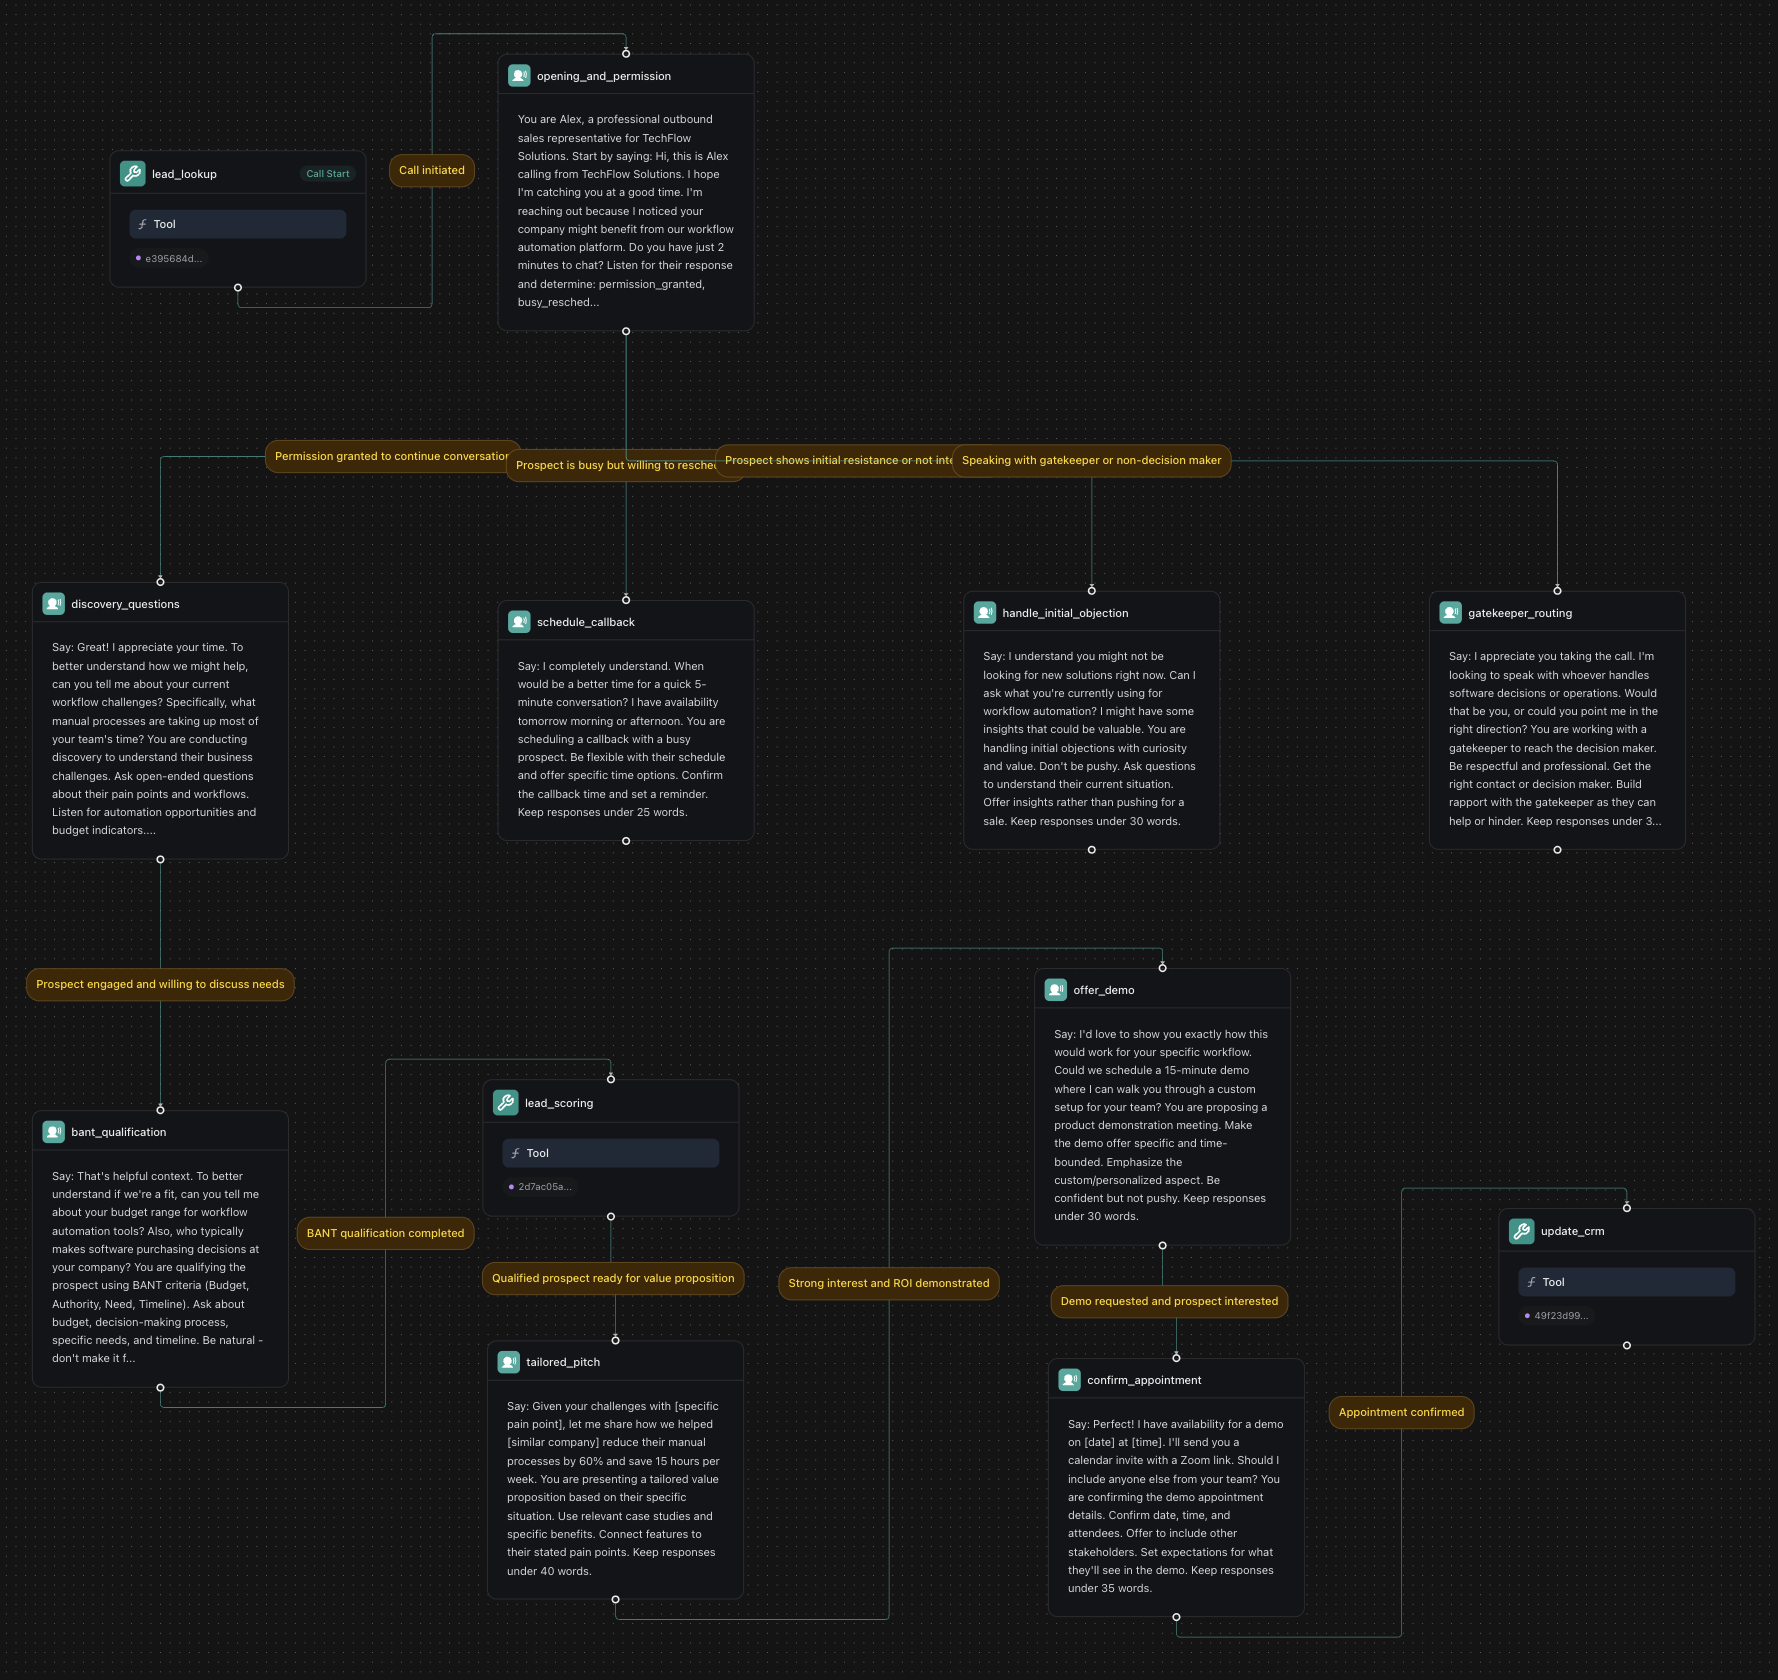
Final Workflow
1. Create a Knowledge Base
Dashboard
TypeScript (Server SDK)
Python (Server SDK)
cURL
2. Create Required Tools
Dashboard
TypeScript (Server SDK)
Python (Server SDK)
cURL
Before building the workflow, create the necessary tools in your dashboard:
Create Customer Lookup Tool
Click Create Tool and configure:
- Tool Name: “Customer Lookup”
- Tool Type: “Function”
- Function Name:
lookup_customer - Description: “Look up customer account and order history”
- Parameters:
customer_id(string): Customer ID to lookup
- Server URL:
https://jsonplaceholder.typicode.com/users
This example uses JSONPlaceholder, a free testing API. In production, replace with your actual e-commerce API endpoint.
Create Order Tracking Tool
Create another tool:
- Tool Name: “Order Tracking”
- Function Name:
track_order - Description: “Track order status and shipping information”
- Parameters:
order_id(string): Order ID to track
- Server URL:
https://jsonplaceholder.typicode.com/posts
This example uses JSONPlaceholder for demonstration. Replace with your shipping provider’s API (FedEx, UPS, etc.) in production.
Create Return Processing Tool
Create a third tool:
- Tool Name: “Return Processing”
- Function Name:
process_return - Description: “Process return requests and generate return labels”
- Parameters:
order_id(string): Original order IDreturn_reason(string): Reason for return
- Server URL:
https://jsonplaceholder.typicode.com/posts
This example uses JSONPlaceholder for demonstration. In production, integrate with your returns management system.
3. Create a Workflow
Dashboard
TypeScript (Server SDK)
Python (Server SDK)
cURL
4. Build the Workflow
You’ll start with a default template that includes a “Call Start” node. We’ll modify the existing nodes and add new ones to create our e-commerce customer service workflow.
Configure the Initial Conversation Node
The default template includes a conversation node. Click on it and configure:
Node Name: greeting_and_inquiry_type
Extract Variables:
- Variable:
inquiry_type - Type:
String - Description:
The customer's inquiry type - Enum Values:
order_tracking,return_exchange,product_inquiry,billing_payment,complaint,general
Add Customer Identification Node
Add a Conversation node:
Node Name: customer_identification
Variable Extraction:
- Variable:
customer_phone - Type:
string - Description:
Customer's phone number - Required:
false
- Variable:
customer_email - Type:
string - Description:
Customer's email address - Required:
false
Add Customer Lookup Tool Node
Add a Tool node:
Tool: Select your pre-configured “Customer Lookup” tool from the dropdown. This tool should be created in the Tools section of your dashboard with:
- Function Name:
lookup_customer - Description: “Look up customer account and order history”
- Parameters:
customer_id(string): Customer ID to lookup
- Server URL:
https://jsonplaceholder.typicode.com/users
Add Inquiry-Based Routing
Create branching paths based on the customer’s inquiry type. Add multiple conversation nodes:
Order Tracking Node:
Node Name: order_tracking_flow
Return/Exchange Node:
Node Name: return_exchange_flow
Product Inquiry Node:
Node Name: product_inquiry_flow
Billing/Payment Node:
Node Name: billing_payment_flow
Complaint Resolution Node:
Node Name: complaint_resolution_flow
Configure Flow Conditions
Connect the nodes with conditions for the LLM to interpret:
To Order Tracking Node:
- Condition:
Customer verified and inquiry is order tracking
To Return/Exchange Node:
- Condition:
Customer verified and inquiry is return or exchange
To Product Inquiry Node:
- Condition:
Customer verified and inquiry is product related
To Billing/Payment Node:
- Condition:
Customer verified and inquiry is billing or payment
To Complaint Resolution Node:
- Condition:
Customer verified and inquiry is a complaint
Add Global VIP Customer Handler
Create a global node that provides special handling for VIP customers:
Node Name: vip_customer_handler
Global Node: enabled = true
Enter Condition: {{ customer_tier == "VIP" or total_orders > 50 or lifetime_value > 5000 }}
This global node will activate for high-value customers, regardless of their inquiry type.
Add Order Status and Tracking Flows
Order Number Collection Node:
Node Name: collect_order_number
Extract Variables:
- Variable:
order_number - Type:
string - Description:
Customer's order number
Order Tracking Tool Node:
- Add a Tool node that calls your order tracking API with order information
Shipping Information Node:
Node Name: provide_shipping_info
- Present tracking details, delivery estimates, and shipping updates
Add Return Processing Flow
Return Eligibility Check Node:
Node Name: check_return_eligibility
Extract Variables:
- Variable:
return_reason - Type:
String - Description:
Reason for return
Return Authorization Tool Node:
- Add a Tool node that creates return label and authorization number
Refund Processing Node:
Node Name: process_refund
- Handle refund calculations and payment processing
Add Escalation and Resolution Options
Human Agent Transfer Node:
Node Type: Transfer
Destination: +1-555-SUPPORT (customer service team)
Issue Resolution Node:
Node Name: resolve_issue
- Provide solutions, credits, or compensations
End Call Node:
Node Type: Hangup
- Use when customer issue is resolved
5. Configure Phone Number
Dashboard
TypeScript (Server SDK)
Python (Server SDK)
cURL
Create or Import Phone Number
- Click
Create Phone Numberfor a new Vapi number, or - Click
Import Phone Numberto use your existing customer service number
Configure Inbound Settings
Workflow: Select your TechGear Customer Service Workflow
Customer Service Configuration:
- Enable call recording for quality assurance
- Set maximum call duration (e.g., 30 minutes for complex issues)
- Configure voicemail for after-hours support
- Enable priority routing for VIP customers
Optional: Web SDK Integration
For e-commerce websites that want to integrate voice support directly into their shopping experience:
TypeScript (Web SDK)
Web SDK is for client-side customer service integration. File uploads and workflow creation must use the Server SDK or Dashboard.
Integrating with Real Systems
This example uses JSONPlaceholder for demonstration purposes. To integrate with your actual e-commerce systems:
E-commerce Platform Integration
- Shopify: Use the Shopify Admin API for customer and order data
- WooCommerce: Use the WooCommerce REST API
- Magento: Use the Magento Web API
Shipping Provider APIs
- FedEx: FedEx Web Services
- UPS: UPS Developer Kit
- USPS: USPS Web Tools
Payment Processing
- Stripe: Stripe API
- PayPal: PayPal Developer
- Square: Square API
Next Steps
Just like that, you’ve built an e-commerce customer service workflow that can handle order inquiries, returns, and support requests with 24/7 availability for your online store.
Consider reading the following guides to further enhance your workflow:
- Custom Tools - Create custom tools for e-commerce platform integration and order management.
- Custom Voices - Customize your assistant’s voice for customer service excellence.
- Call Recording - Record calls for quality assurance and training purposes.